Inventory Management Quick Start
Inventory visibility is critical for suppliers to manage inventories in their channels. A supplier that fails to do so risks high or low inventory stock events, missed sales opportunities, and customer disappointment. Knowing how much inventory is in a channel helps to mitigate these risks.
In this Quick Start, we will deploy a sample inventory channel involving a single Distribution Center and two retailers.
By the end of the Quick Start you will have:
- Created a Universal Application (Uni) with a pre-defined data model
- Defined a channel of partners and created them as parties in our Uni
- Used GraphQL queries and mutations to both read from and write to our inventory
- [Optionally] Set up block notifications to have visibility when updates are made to the Uni's data
Pre-requisites
This Quick Start uses the Vendia Share Command Line Interface (CLI) for creating and managing Unis. We will be using the share-cli to deploy and manage our product catalog.
Command Line Installation
The share-cli can be installed using the NodeJS Node Package Manager(NPM).
To install the CLI globally, run the following command:
npm install --global @vendia/share-cli
NOTE: You can also install the Vendia CLI inside of a project (instead of globally).
For more information, please visit the @vendia/share-cli NPM package page or view the CLI commands list.
Register for Vendia Share
You will need to have a valid Vendia Share user in order to deploy this Quick Start. Please sign up for Vendia Share if you have not already done so.
Step 1 - Prepare the Deployment Files for the Uni
In this Quick Start, we have provided sample files including a data model for your use that describes product inventory data.
Save the Quick Start Files
The files listed below should be saved to your computer. For simplicity, save them all to the same directory.
Sample registration file - save as registration.json
The registration.json file defines the Uni name, location of the schema file, and the participants in the Uni. Optionally, it can also include the location of an initState file that seeds the Uni with data when it is created.
{
  "name": "test-inventory",
  "schema": "schema.json",
  "nodes": [
    {
      "name": "DistributionCenter",
      "userId": "me@domain.com",
      "region": "us-east-2",
      "csp": "aws"
    },
    {
      "name": "Retailer1",
      "userId": "me@domain.com",
      "region": "us-west-2",
      "csp": "aws"
    }
  ]
}
NOTE: You will need to provide your Vendia Share userId when defining your node.
ANOTHER NOTE: Pick a unique name for your Uni that begins with test- - by default all Unis share a common namespace so here is your chance to get creative.
ONE MORE NOTE: You can deploy your nodes to many different regions spread across the globe. In this example, we are deploying two nodes to two separate AWS regions. Each node will have a consistent view of inventory data. Please review the list of supported cloud platforms and regions.
Sample schema file - save as schema.json
The schema is used to define the shape of the inventory data held in your Uni. Vendia Share will take this data model and create the API and GraphQL queries used for interacting with our inventory data.
{
  "$schema": "http://json-schema.org/draft-07/schema#",
  "$id": "http://vendia.com/schemas/demos/inventory-management-system.json",
  "title": "Inventory Management System",
  "description": "Store inventory data",
  "type": "object",
  "properties": {
    "Inventory": {
      "description": "Inventory",
      "type": "array",
      "items": {
        "type": "object",
        "properties": {
          "itemName": {
            "description": "Item name",
            "type": "string"
          },
          "itemNumber": {
            "description": "Item number",
            "type": "string"
          },
          "quantity": {
            "description": "Available quanitity of item",
            "type": "integer"
          },
          "tags": {
            "description": "Tags associated with item",
            "type": "array",
            "items": {
              "type": "string"
            }
          }
        }
      }
    }
  }
}
Step 2 - Command Line Deployment
Once the files are saved, deploy the Uni using the share-cli.
If not already logged in to the share service do so by running share login:
share login
The share uni create command can be used to deploy our Uni.
share uni create --config registration.json
Check on Uni Status
The Uni deployment will take approximately 4 minutes. The status of the Uni deployment can be viewed by running the share get command.
NOTE: Your Uni name should differ from the example. Set the value of the --uni argument accordingly to match the Name property in registration.json.
 % % share get --uni test-inventory
Getting test-inventory info...
┌─────────────────────┐
│   Uni Information   │
└─────────────────────┘
Uni Name:    test-inventory.unis.vendia.net
Uni Status:  RUNNING
Node Count:  2
Nodes Info:
├─ ⬢ DistributionCenter
│  ├─ name: DistributionCenter
│  ├─ status: RUNNING
│  └─ resources:
│     ├─ graphqlApi
│     │  ├─ httpsUrl https://uct0vay436.execute-api.us-east-2.amazonaws.com/graphql/
│     │  ├─ apiKey fmmjMHlUiE6sQIA8Ho-uAAeBGGya-znVPhMNjMGQ
│     │  └─ websocketUrl wss://az7ovls62m.execute-api.us-east-2.amazonaws.com/graphql
│     ├─ aws_AsyncIngressQueue
│     │  ├─ url https://sqs.us-east-2.amazonaws.com/158170696360/ingressQ_test-inventory_DistributionCenter
│     │  └─ name ingressQ_test-inventory_DistributionCenter
│     ├─ aws_FileStorage
│     │  ├─ arn arn:aws:s3:::test-inventory-1-distributioncent-bucket83908e77-t5bmoki9dxuf
│     │  └─ name test-inventory-1-distributioncent-bucket83908e77-t5bmoki9dxuf
│     ├─ aws_BlockNotifications
│     │  └─ arn arn:aws:sns:us-east-2:158170696360:test-inventory-1-DistributionCenter-BlockTopic661B6EDF-1DRKYVBTDDKNX
│     ├─ aws_DeadLetterNotifications
│     │  └─ arn arn:aws:sns:us-east-2:158170696360:test-inventory-1-DistributionCenter-DeadLetterTopicC237650B-1K2XLXH3KU64W
│     └─ aws_Cognito
│        ├─ userPoolId null
│        ├─ userPoolClientId null
│        └─ identityPoolId null
└─ ⬢ Retailer1
   ├─ name: Retailer1
   ├─ status: RUNNING
   └─ resources:
      ├─ graphqlApi
      │  ├─ httpsUrl https://5vggruwyg4.execute-api.us-west-2.amazonaws.com/graphql/
      │  ├─ apiKey aaziLde-zr6AiBMfrBvMviZsYoyNUy2RBi7yExjA
      │  └─ websocketUrl wss://1jg8x5h9h0.execute-api.us-west-2.amazonaws.com/graphql
      ├─ aws_AsyncIngressQueue
      │  ├─ url https://sqs.us-west-2.amazonaws.com/836878200371/ingressQ_test-inventory_Retailer1
      │  └─ name ingressQ_test-inventory_Retailer1
      ├─ aws_FileStorage
      │  ├─ arn arn:aws:s3:::test-inventory-1-retailer1-bucket83908e77-1jhkmsvfyo78y
      │  └─ name test-inventory-1-retailer1-bucket83908e77-1jhkmsvfyo78y
      ├─ aws_BlockNotifications
      │  └─ arn arn:aws:sns:us-west-2:836878200371:test-inventory-1-Retailer1-BlockTopic661B6EDF-VJCMRFWF0ITY
      ├─ aws_DeadLetterNotifications
      │  └─ arn arn:aws:sns:us-west-2:836878200371:test-inventory-1-Retailer1-DeadLetterTopicC237650B-EGE8Y0RXQHIZ
      └─ aws_Cognito
         ├─ userPoolId null
         ├─ userPoolClientId null
         └─ identityPoolId null

To display schema & initial state, use the --json flag. Example: "share get test-inventory.unis.vendia.net --json"
When the Uni status changes to RUNNING we can begin interacting with it.
Step 3 - Query Inventory Data
Now that our Uni is in a RUNNING state know that each node - DistributionCenter and Retailer1 - is available for each party to use.
The easiest way to interact with data in our inventory Uni is to use the built-in GraphQL Explorer provided by the Vendia Share web interface. Click on the name of the Uni you created. Each node in a Uni has its own GraphQL Explorer. Let's use the DistributionCenter GraphQL Explorer.
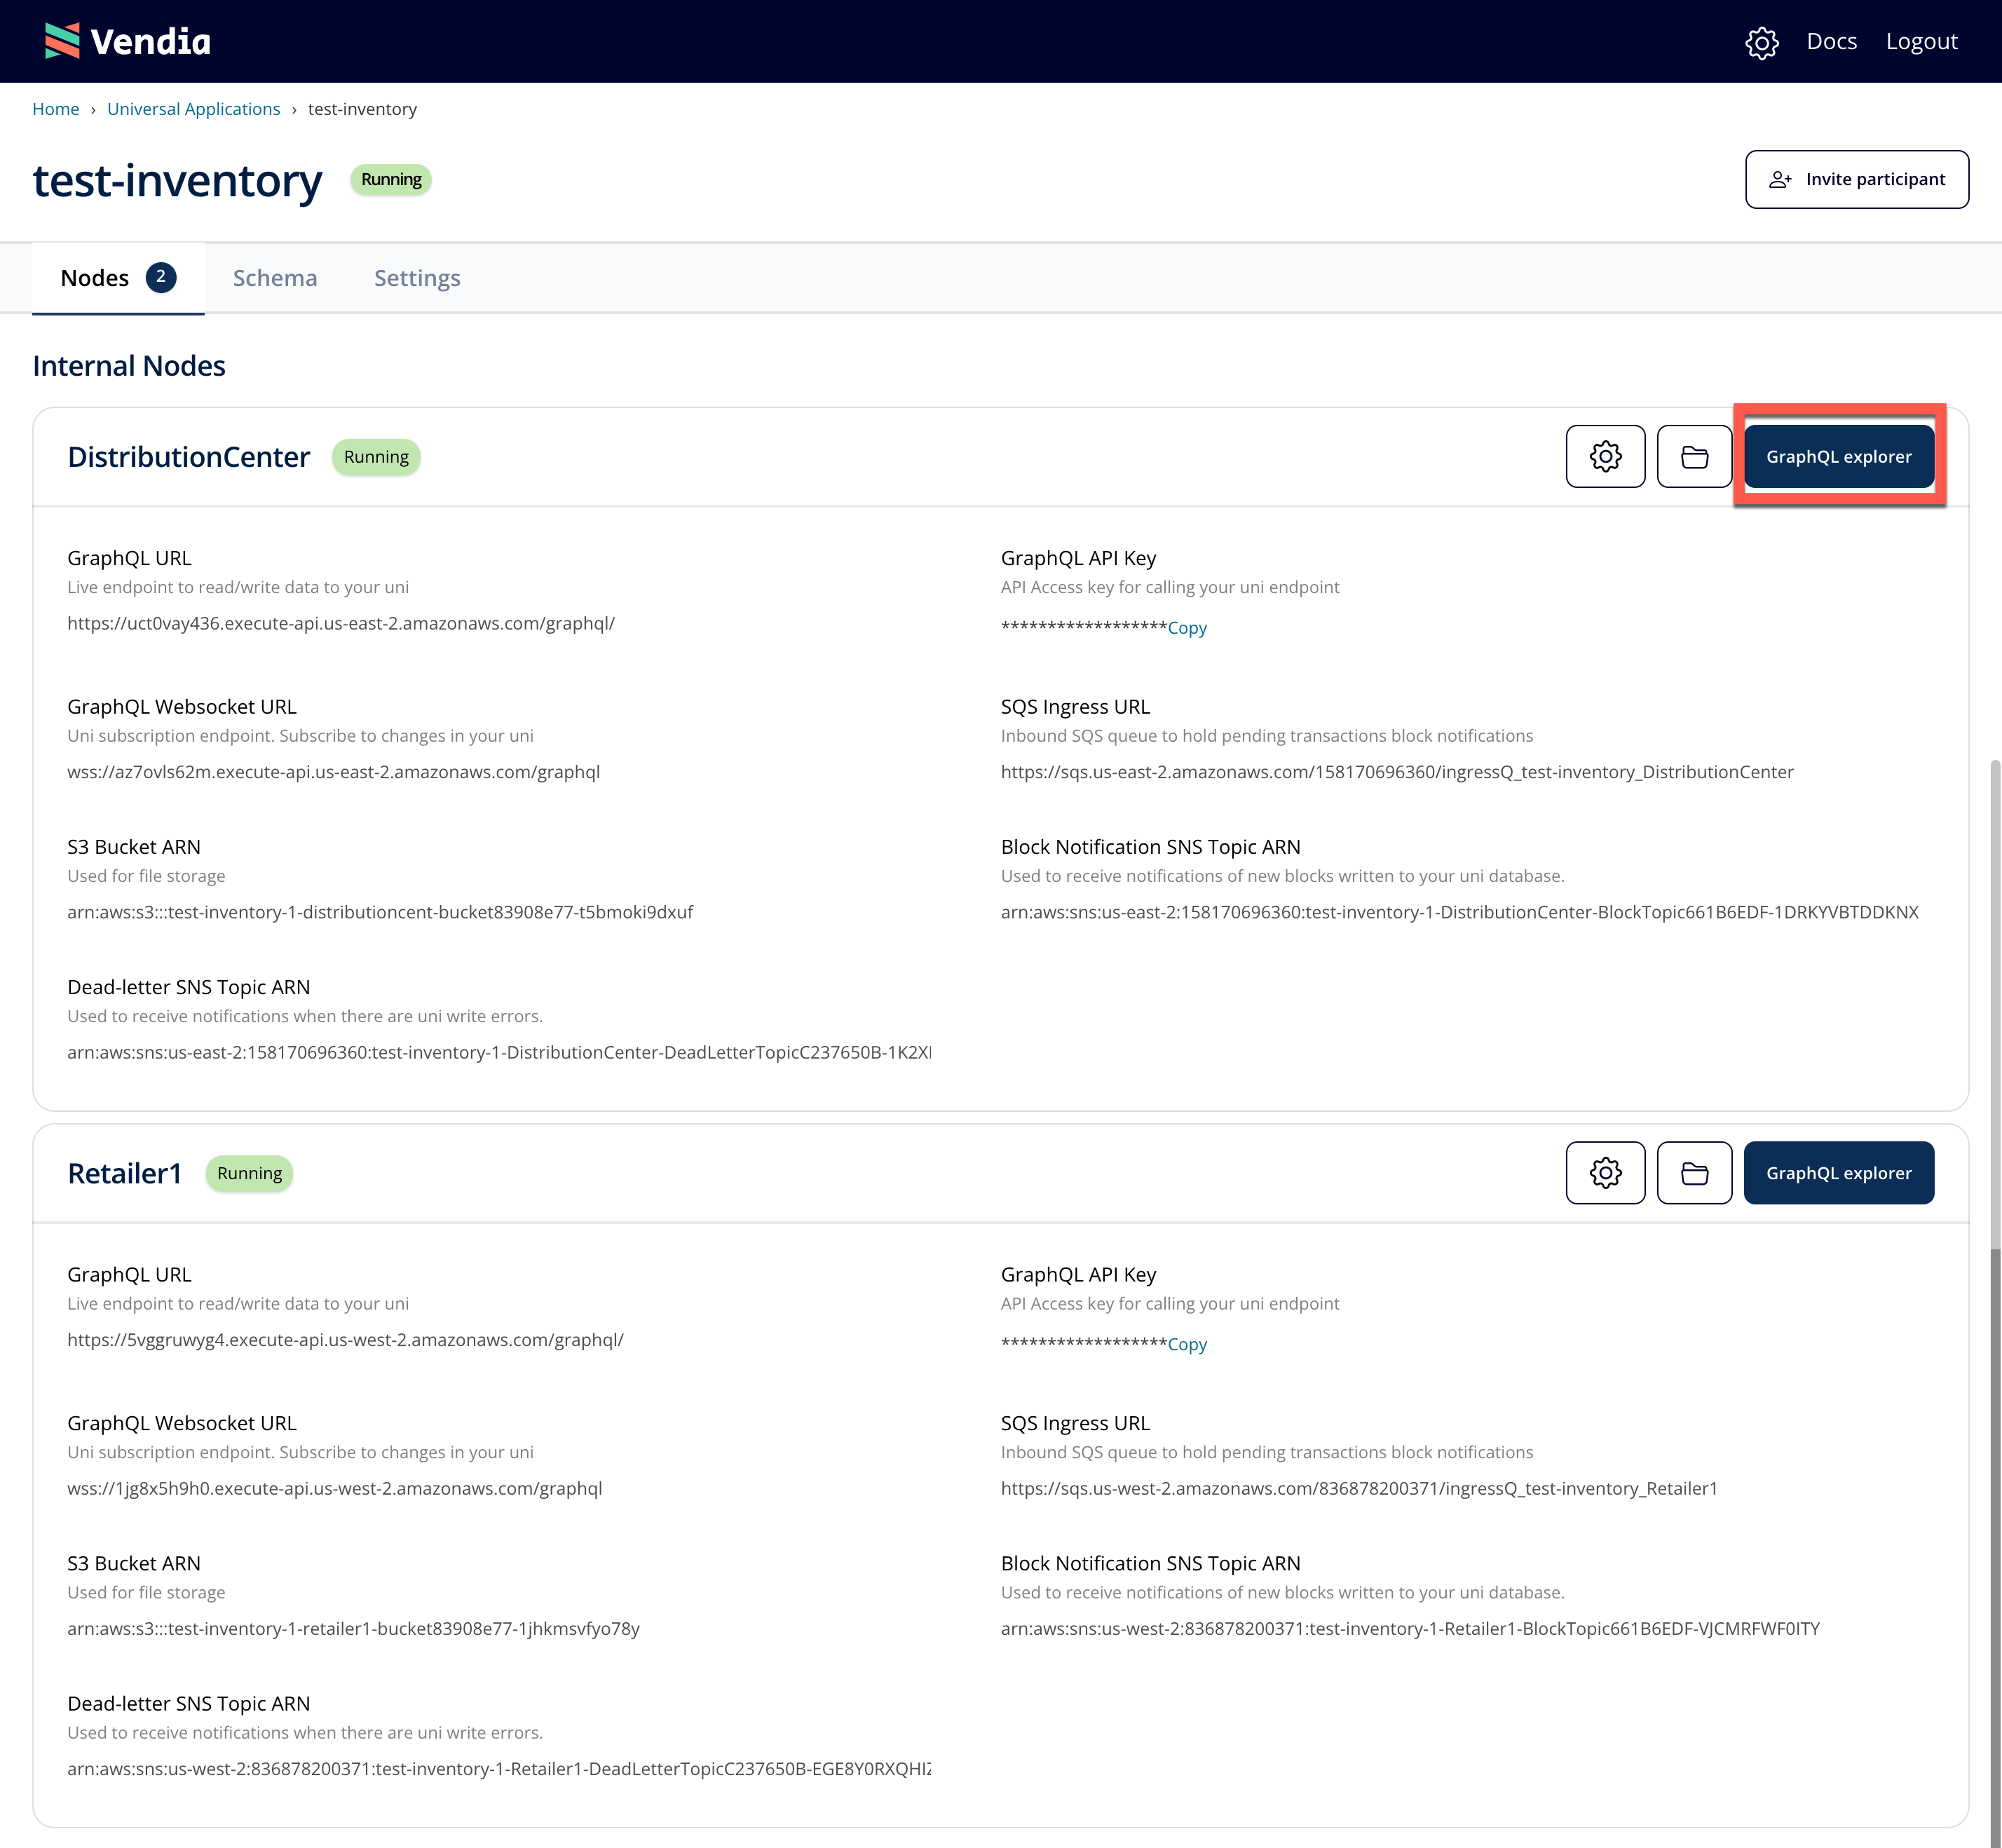
NOTE: You are not constrained to running GraphQL queries from the provided GraphQL Explorer. You can query nodes using the graphqlurl and graphqlapikey specified on your Uni's settings page with the programming language of your choice.
Run Your First Query
The GraphQL Explorer window will be pre-populated with an example query. Delete this query and replace it with the query below to view your inventory. Run the query by pressing the play button.
query listItems {
  list_InventoryItems {
    _InventoryItems {
      _id
      itemName
      itemNumber
      quantity
      tags
    }
  }
}
The inventory list should be empty. Our first order of business will be to add initial inventory data.
Step 4 - Create New Entries in the Inventory
Now that we have queried our data, let's go ahead and add new items to our inventory. Copy and paste the text below and execute each of the addWidget mutations from the DistributionCenter GraphQL Explorer.
mutation addWidget1 {
  add_Inventory(
    input: {
      itemName: "Widget 1",
      itemNumber: "w123-a",
      quantity: 1000,
      tags: [
        "new-release",
        "stainless-steel"
      ]
    },
    syncMode: ASYNC
  ) {
    transaction {
      _id
    }
  }
}

mutation addWidget2 {
  add_Inventory(
    input: {
      itemName: "Widget 2",
      itemNumber: "w124-b",
      quantity: 1000,
      tags: [
        "low-stock",
        "reorder"
      ]
    },
    syncMode: ASYNC
  ) {
    transaction {
      _id
    }
  }
}

mutation addWidget3 {
  add_Inventory(
    input: {
      itemName: "Widget 3",
      itemNumber: "w125-a",
      quantity: 1378
    },
    syncMode: ASYNC
  ) {
    transaction {
      _id
    }
  }
}
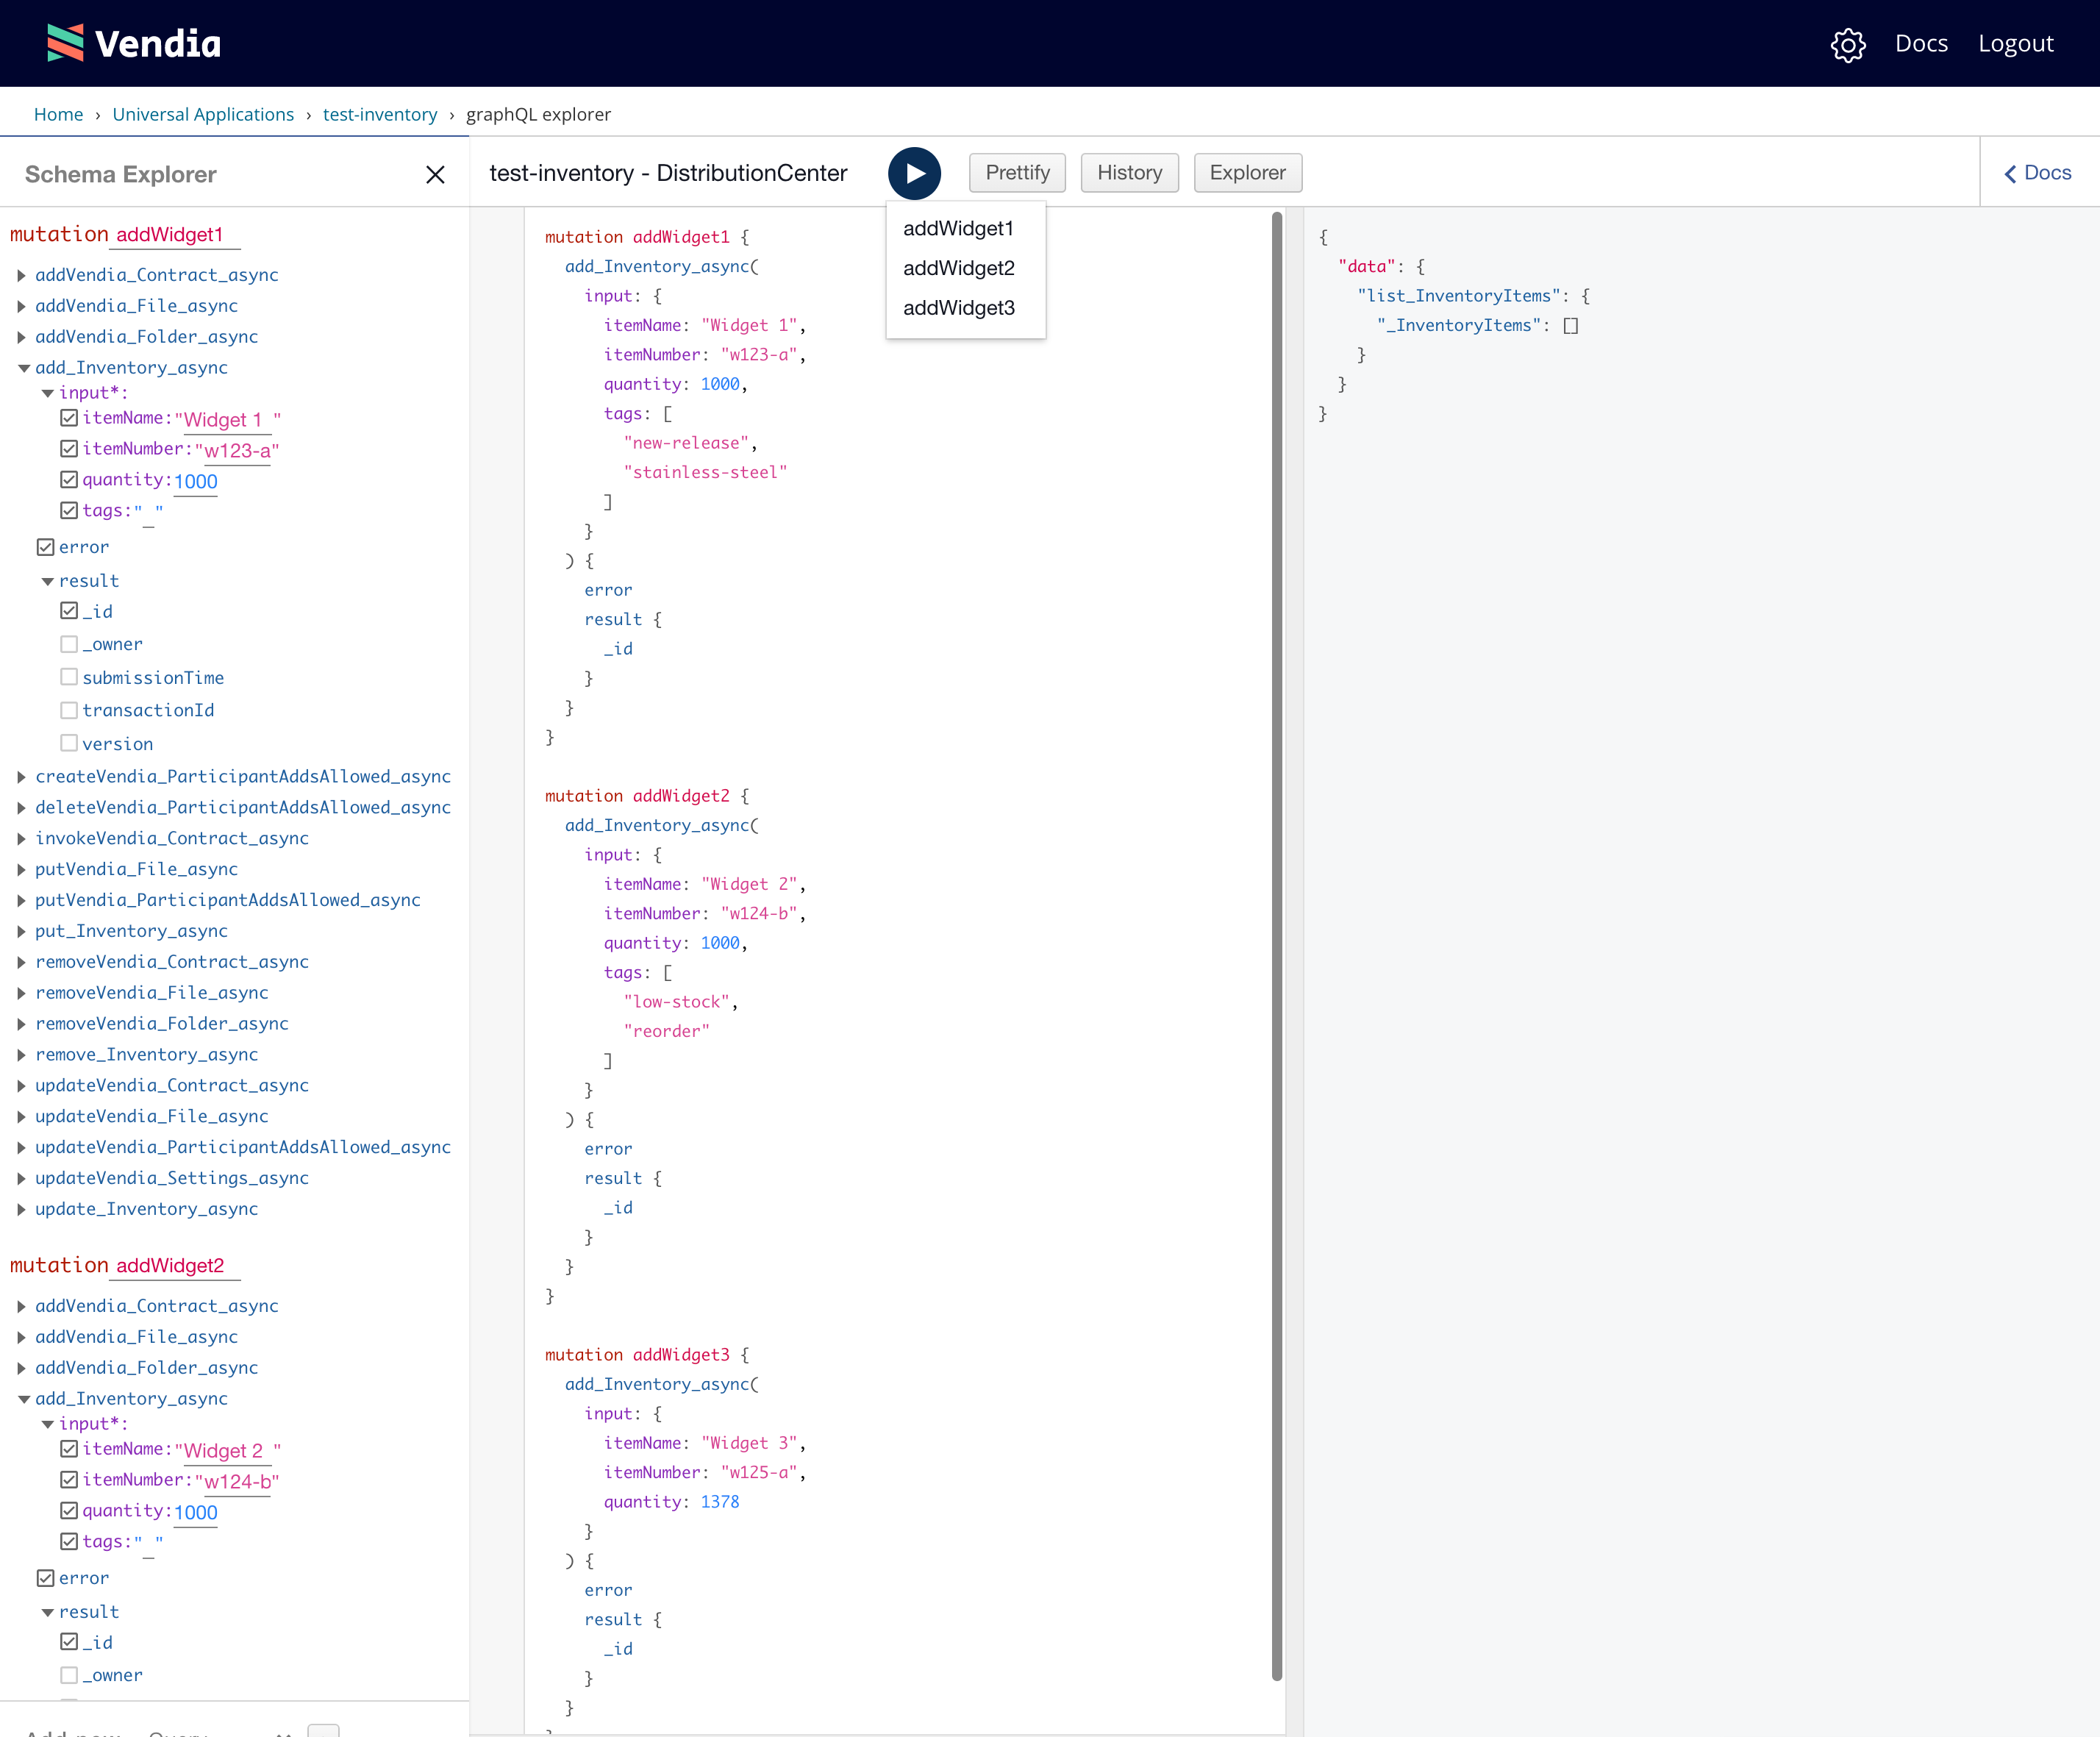
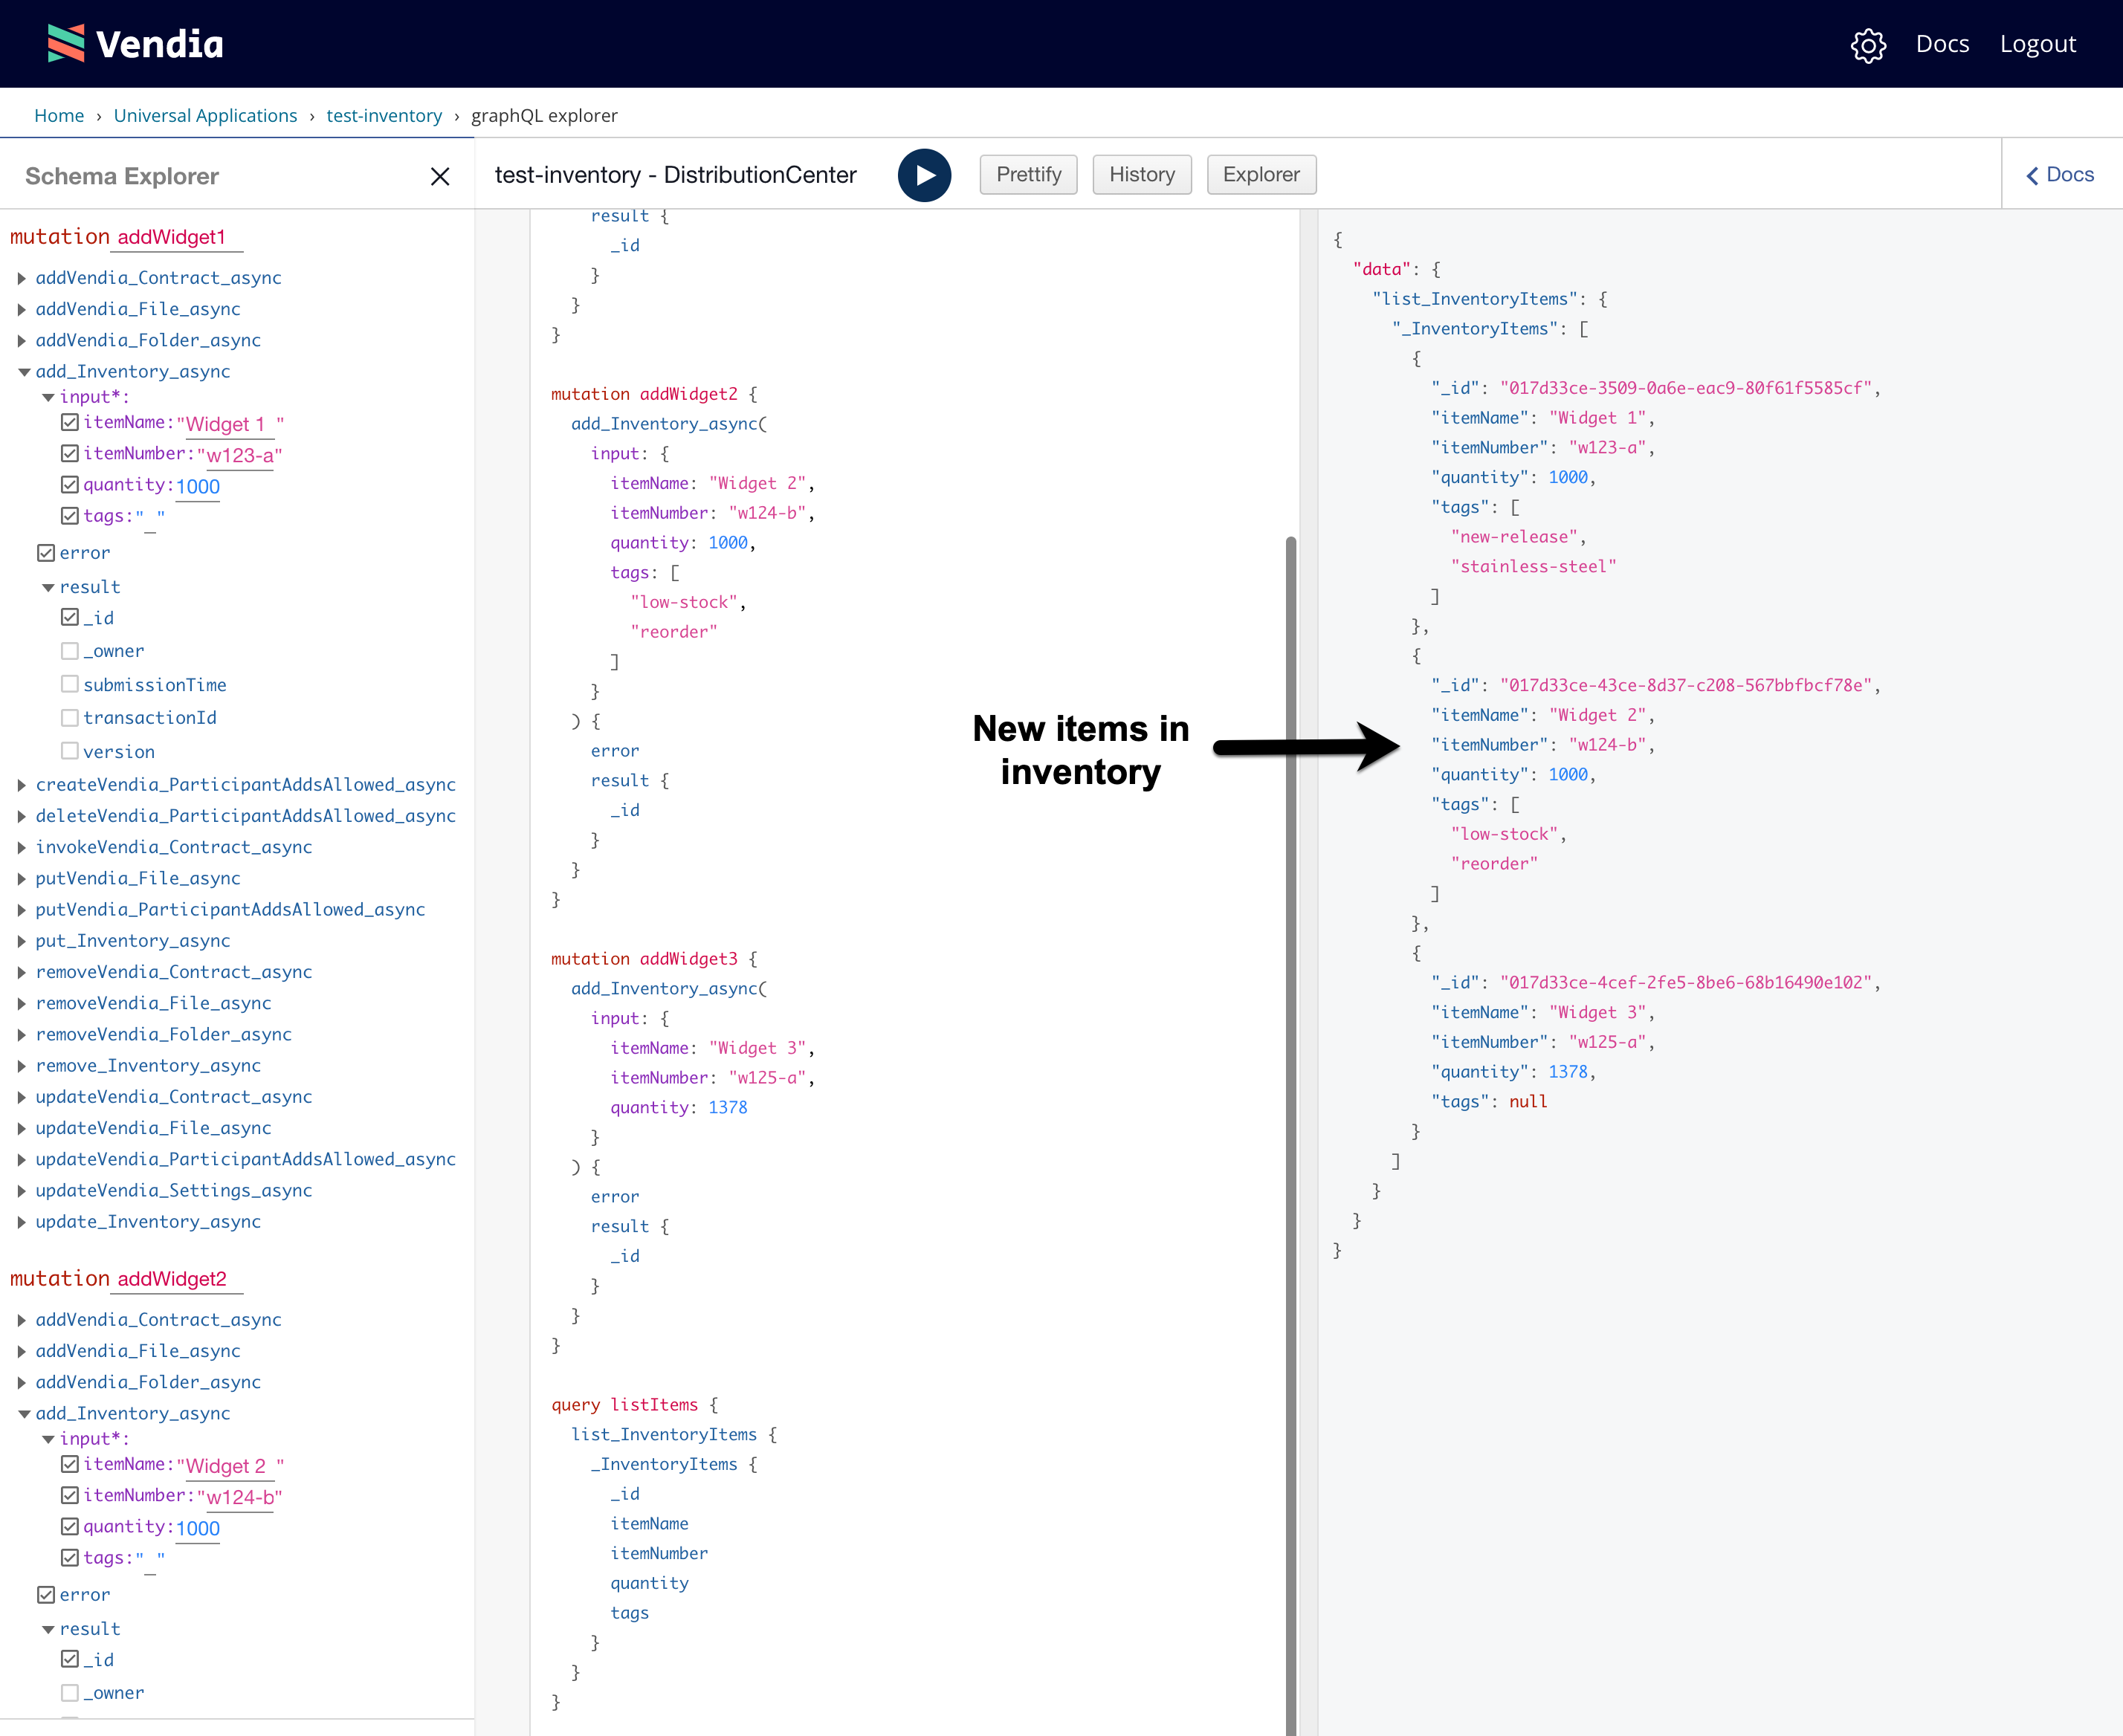
If we run the listItems query we will see the new products we added to the inventory.
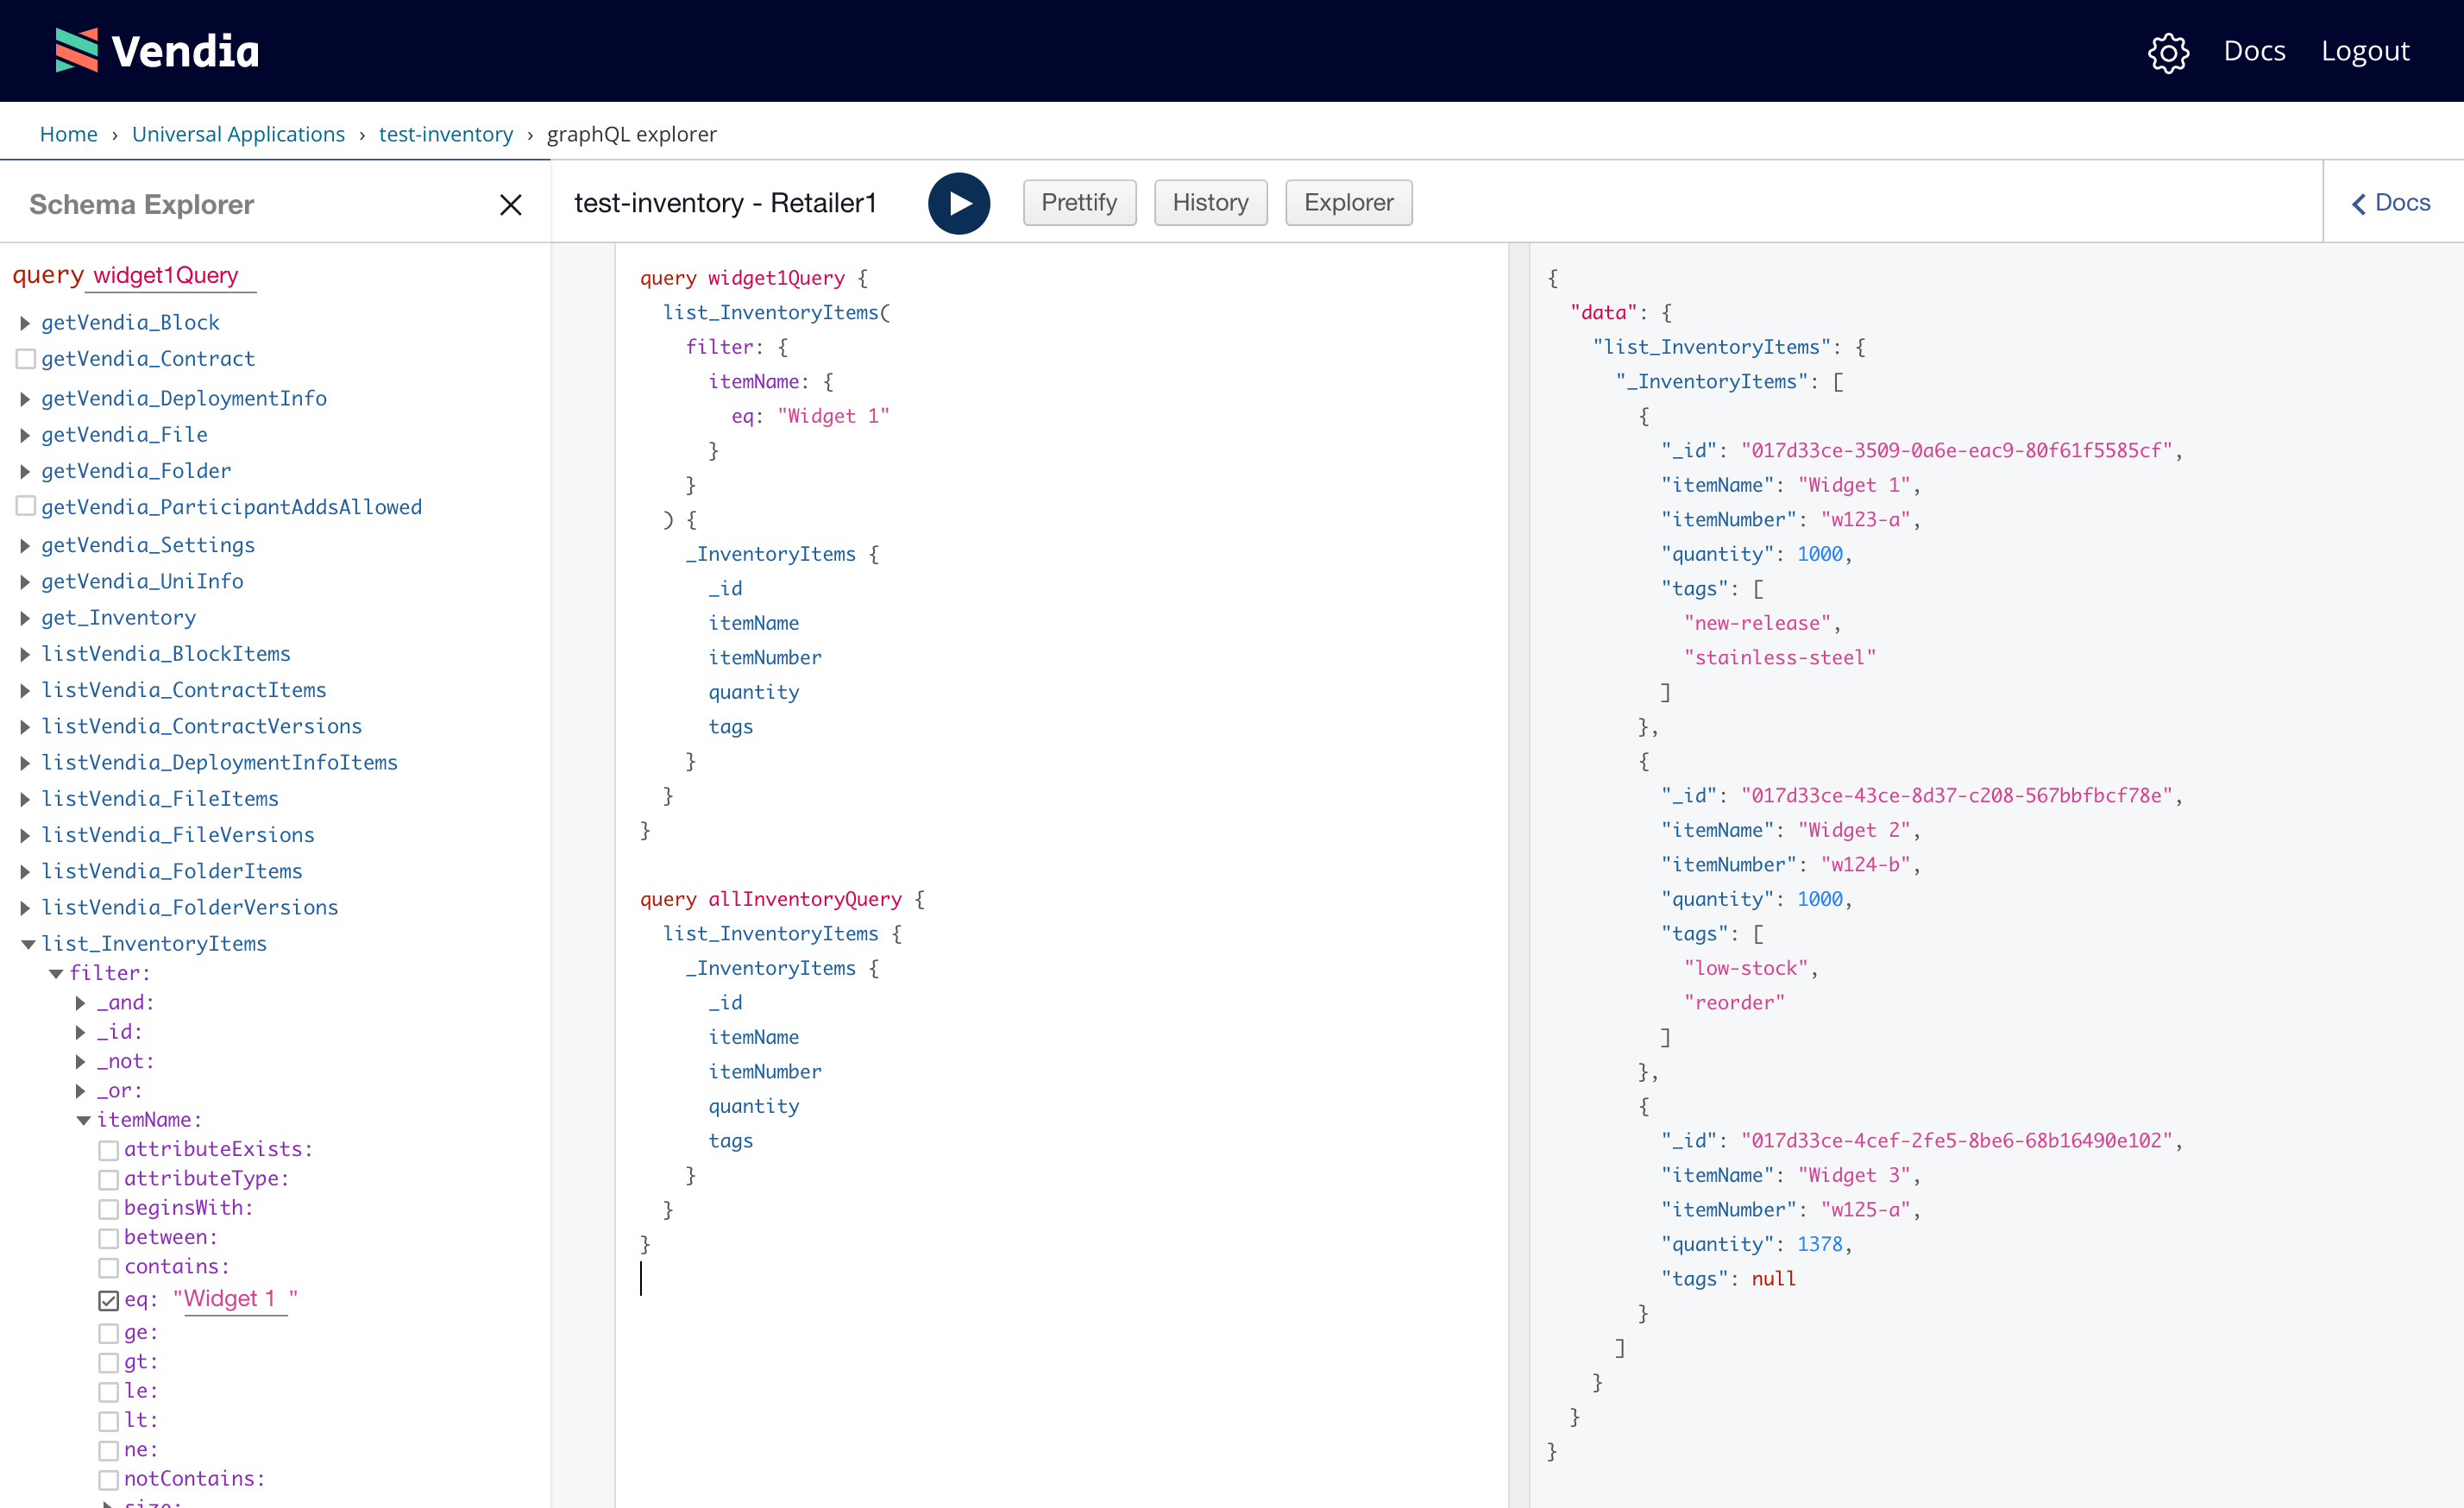
Step 5 - Query Inventory Data from Retailer1
Now that we have data in our Uni, let's query it from another node. Remember - our Uni presents a consistent view of data across all nodes in the Uni. Let's go back to our Uni's home page and select the GraphQL Explorer for Retailer1. Members of our supply chain would want to know how much stock is available from a distribution center if their on-hand inventory is approaching a low level.
We can use filtered or unfiltered queries to drill down into our inventory data.
Filtered Query of Inventory Data
We can search for inventory and filter our results. Let's say that Retailer1 knows their in-store quantity of Widget 1 is low and they need a shipment from the Distribution Center. The following filtered query could be used to display the attributes of Widget 1 inventory stock.
query widget1Query {
  list_InventoryItems(
    filter: {
      itemName: {
        eq: "Widget 1"
      }
    }
  ) {
    _InventoryItems {
      _id
      itemName
      itemNumber
      quantity
      tags
    }
  }
}
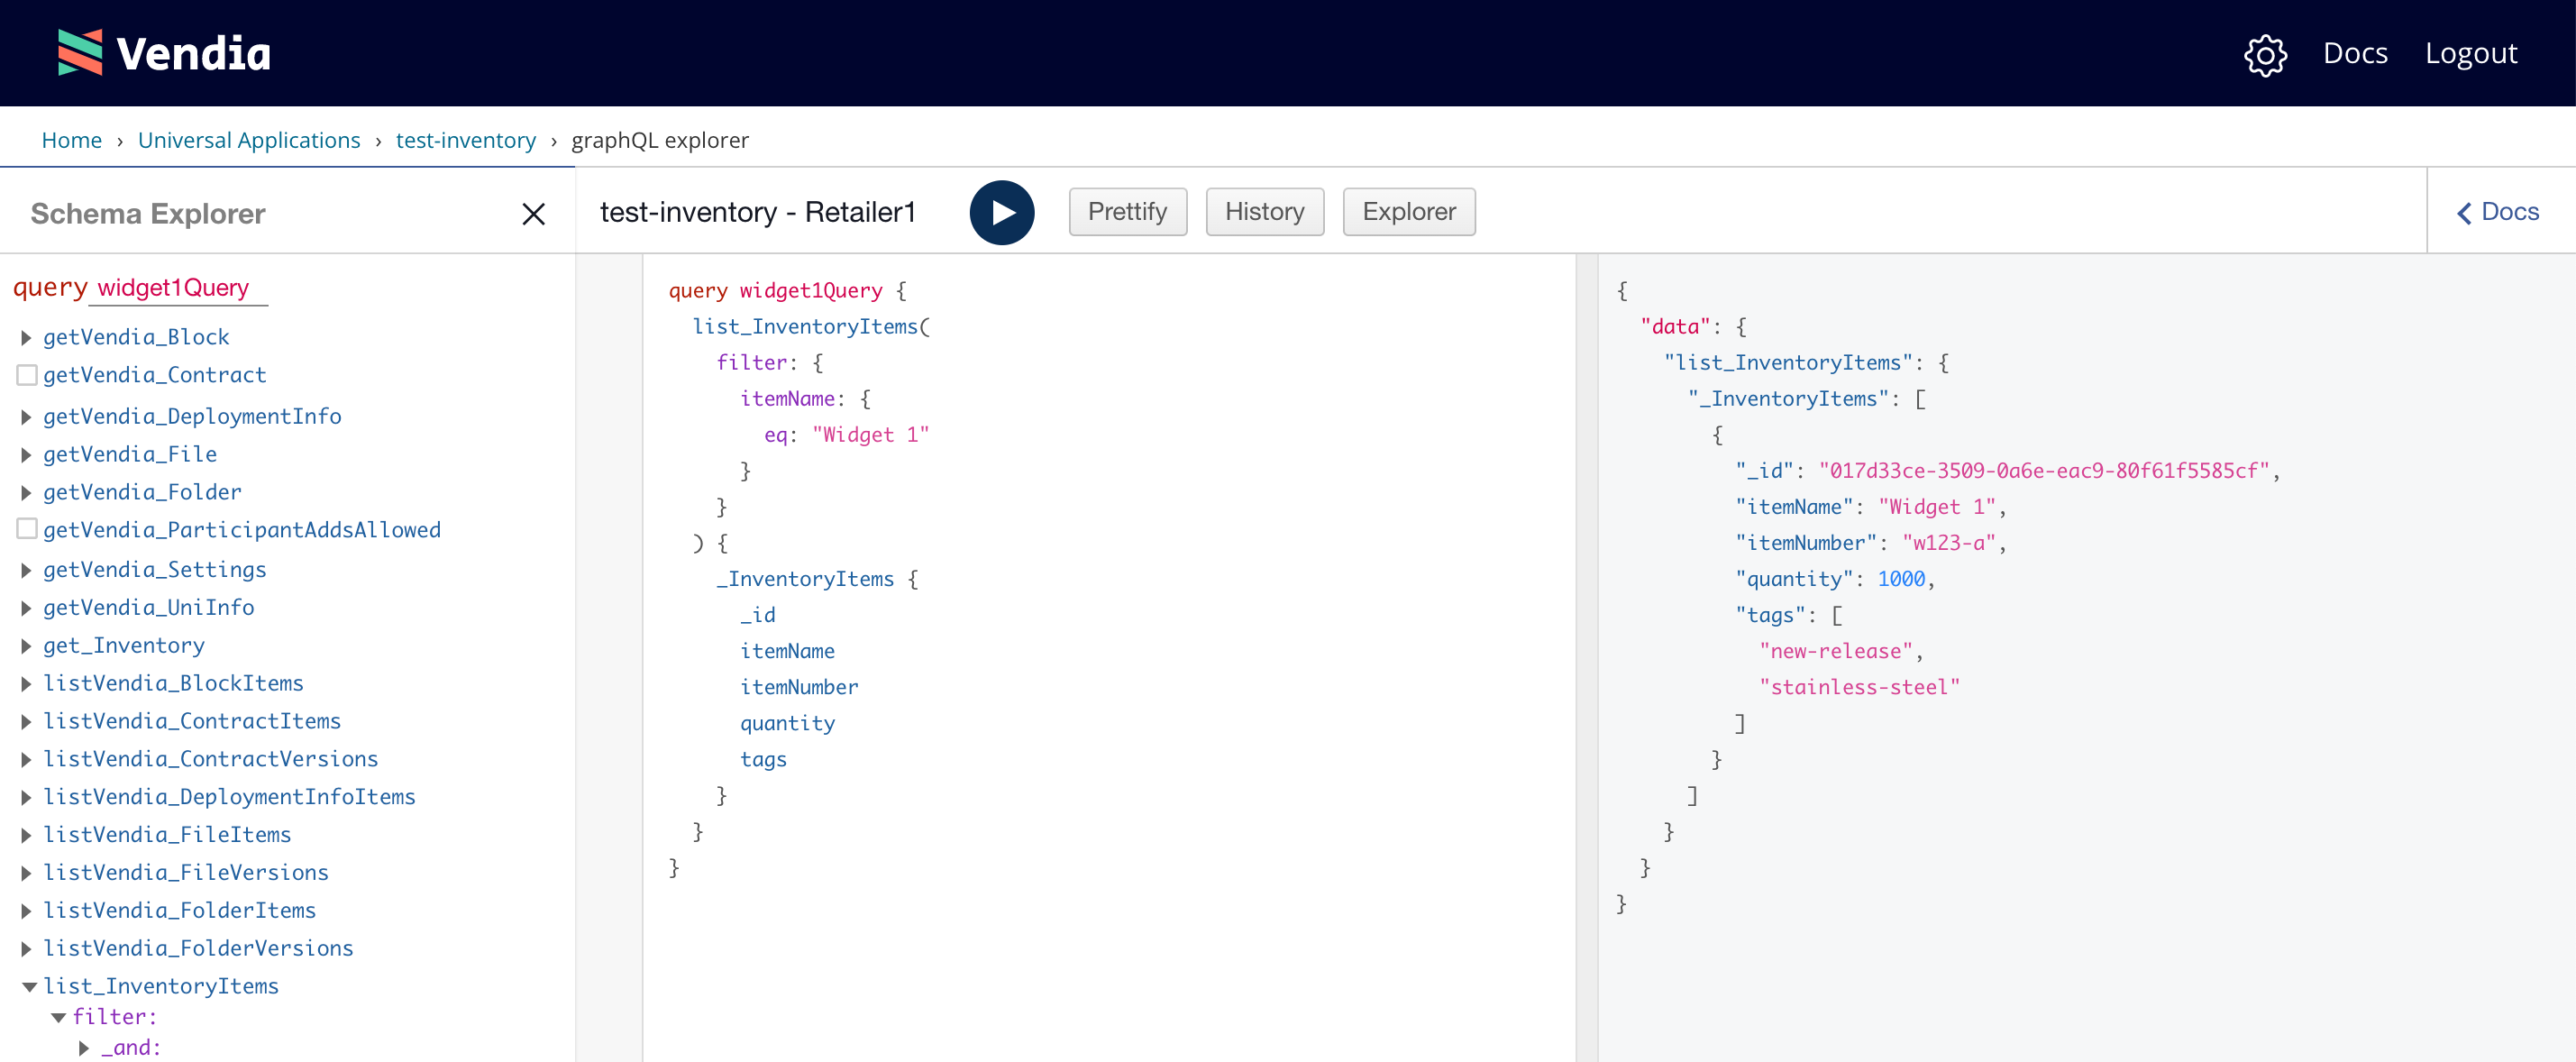
NOTE: Make note of the _id value. We're going to need it when we update the quantity for Widget 1.
Unfiltered Query of Inventory Data
If Retailer1 wanted to view the _id, itemName, itemNumber, quantity, and tags attributes of all inventory stock the following unfiltered query could be used.
query allInventoryQuery {
  list_InventoryItems {
    _InventoryItems {
      _id
      itemName
      itemNumber
      quantity
      tags
    }
  }
}
Note: Make note of the value in the
_idfield for Widget 1, as we'll reference that value in the next section.
Step 6 - Update Inventory Data
Let's continue our scenario of Retailer1 having low quantities of Widget 1 on-hand. They would like to have an additional 200. The query below is used to update the available quantity of Widget 1 from 1000 to 1200.
Note: The "YOUR ID HERE" should be replaced with the Widget 1
_idvalue from the previous step
mutation updateQuantityWidget1 {
  update_Inventory(
    id: "YOUR ID HERE",
    input: {
      itemName: "Widget 1",
      itemNumber: "w123-a",
      quantity: 1200,
      tags: [
        "new-release",
        "stainless-steel"
      ]
    },
    syncMode: ASYNC
  ) {
    transaction {
      _id
    }

  }
}
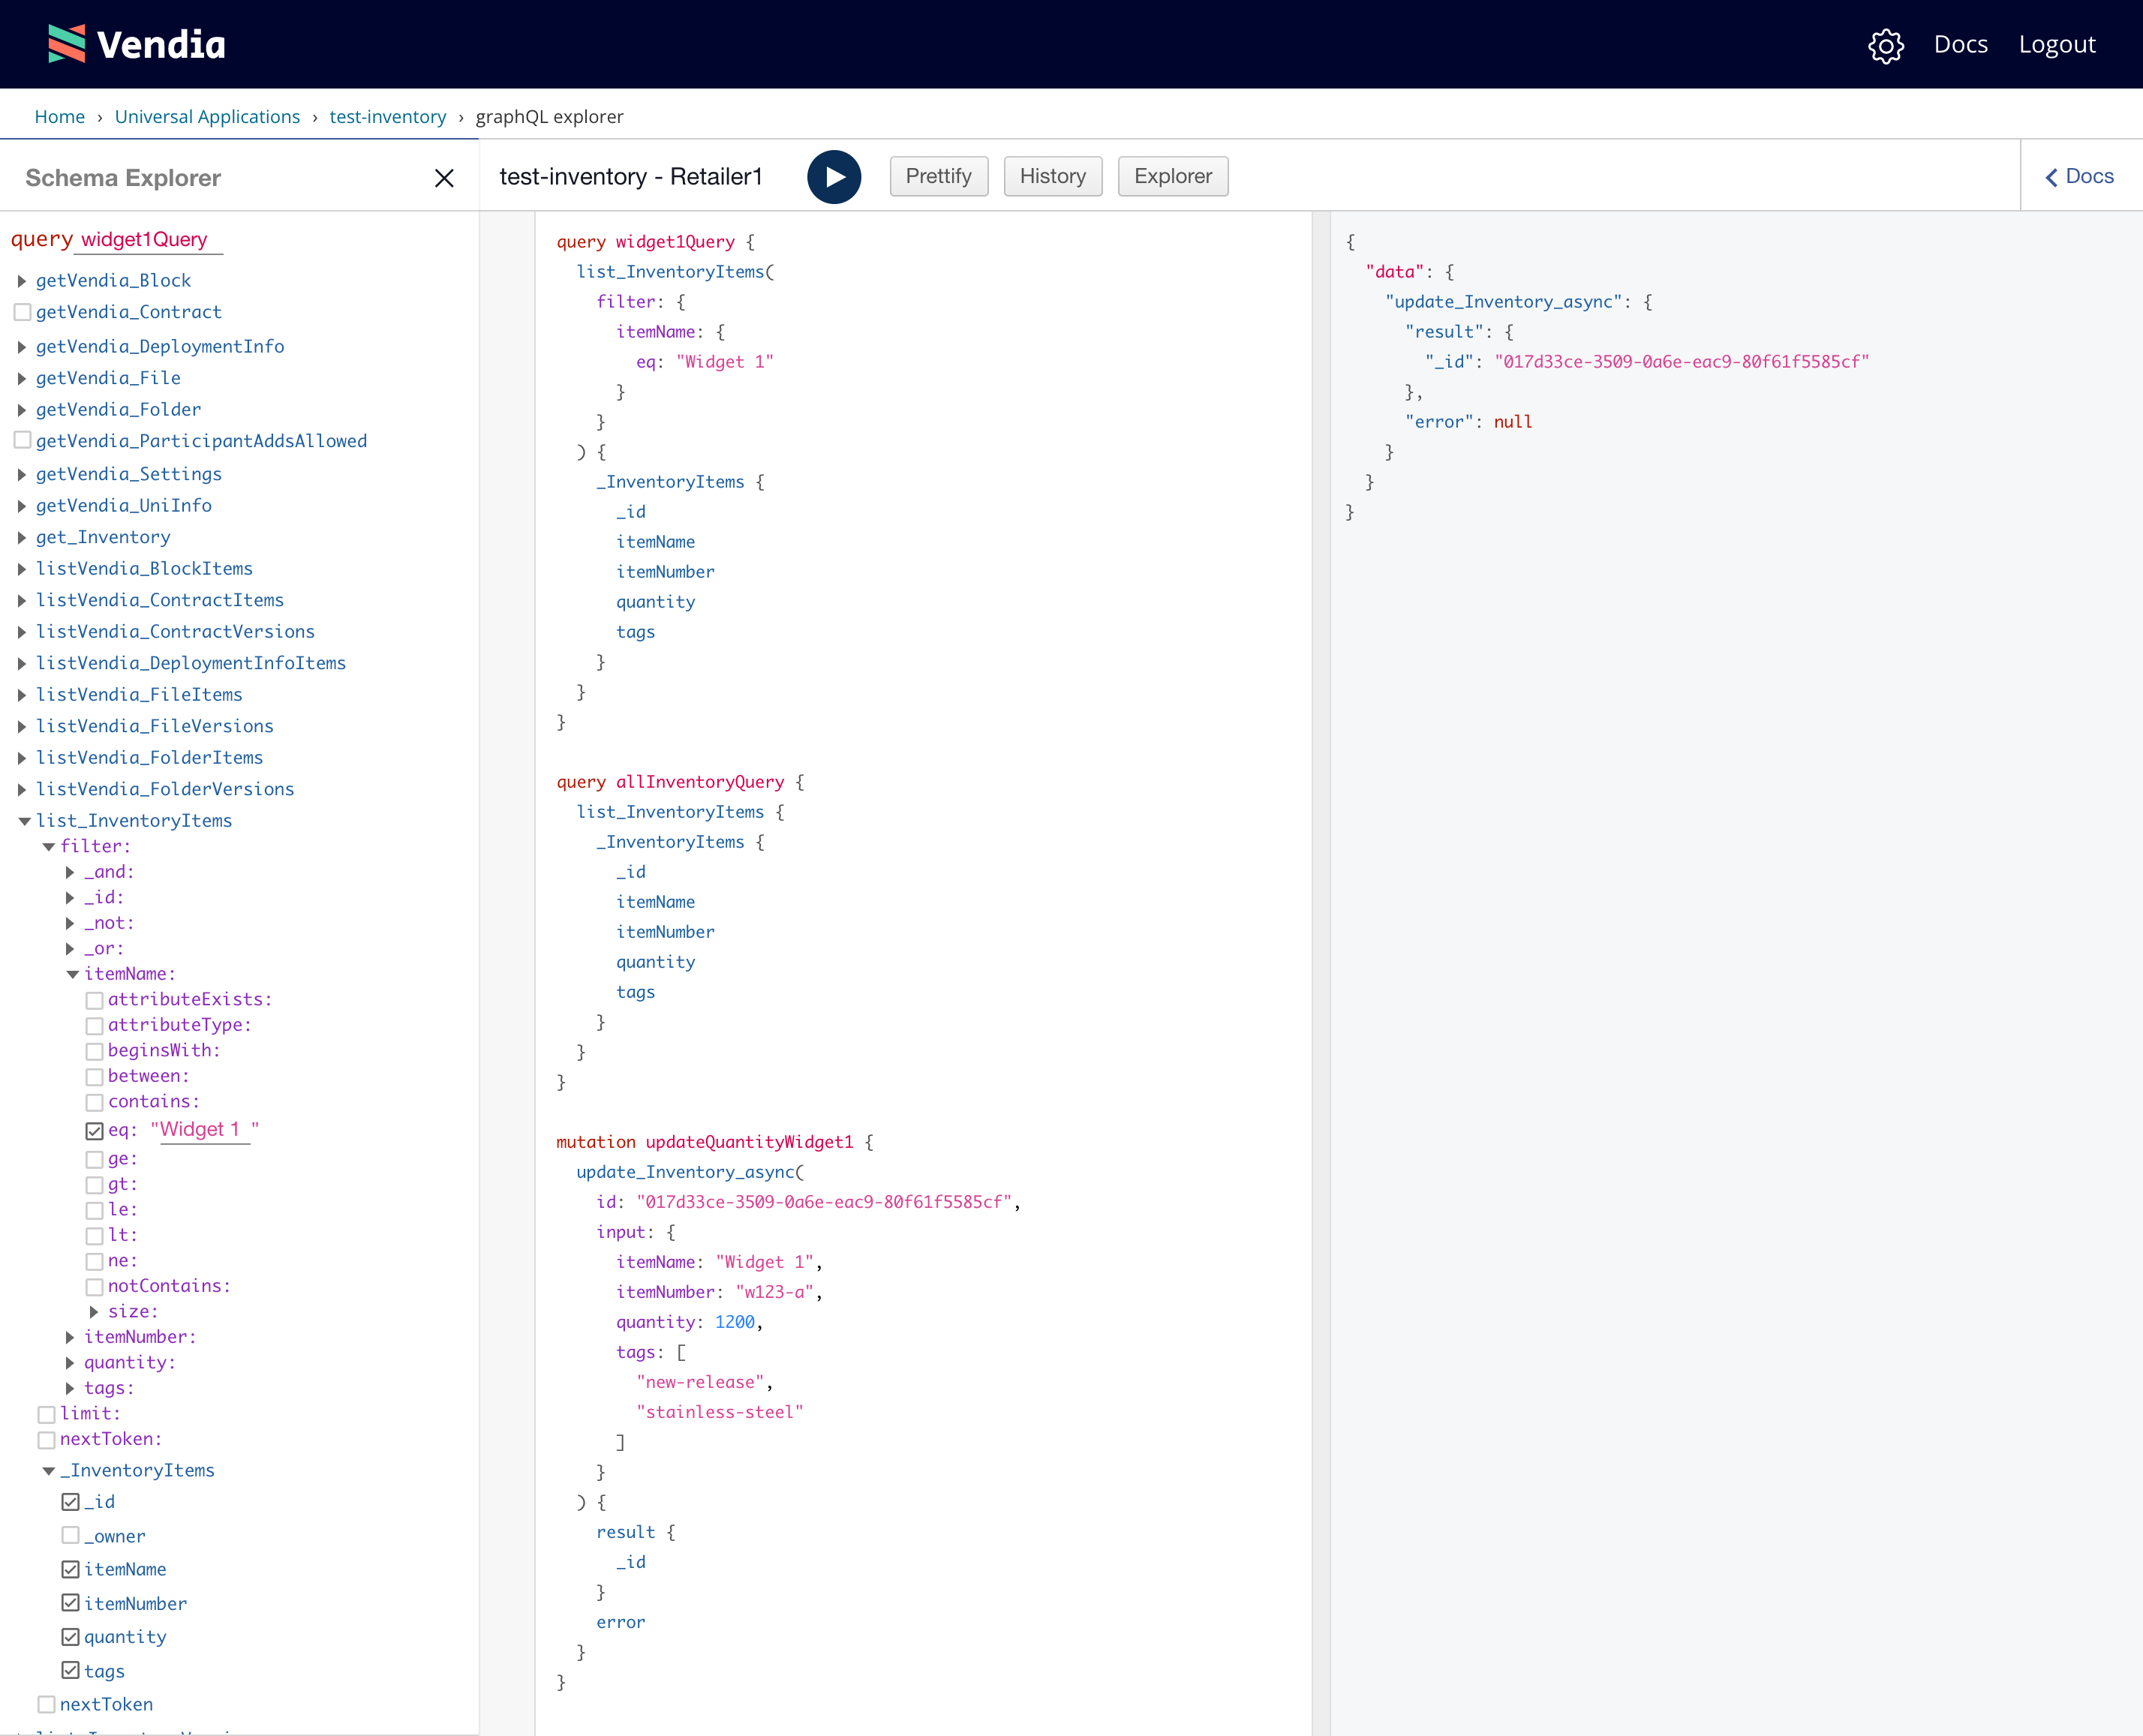
NOTE: The id value used in this query should be adjusted accordingly.
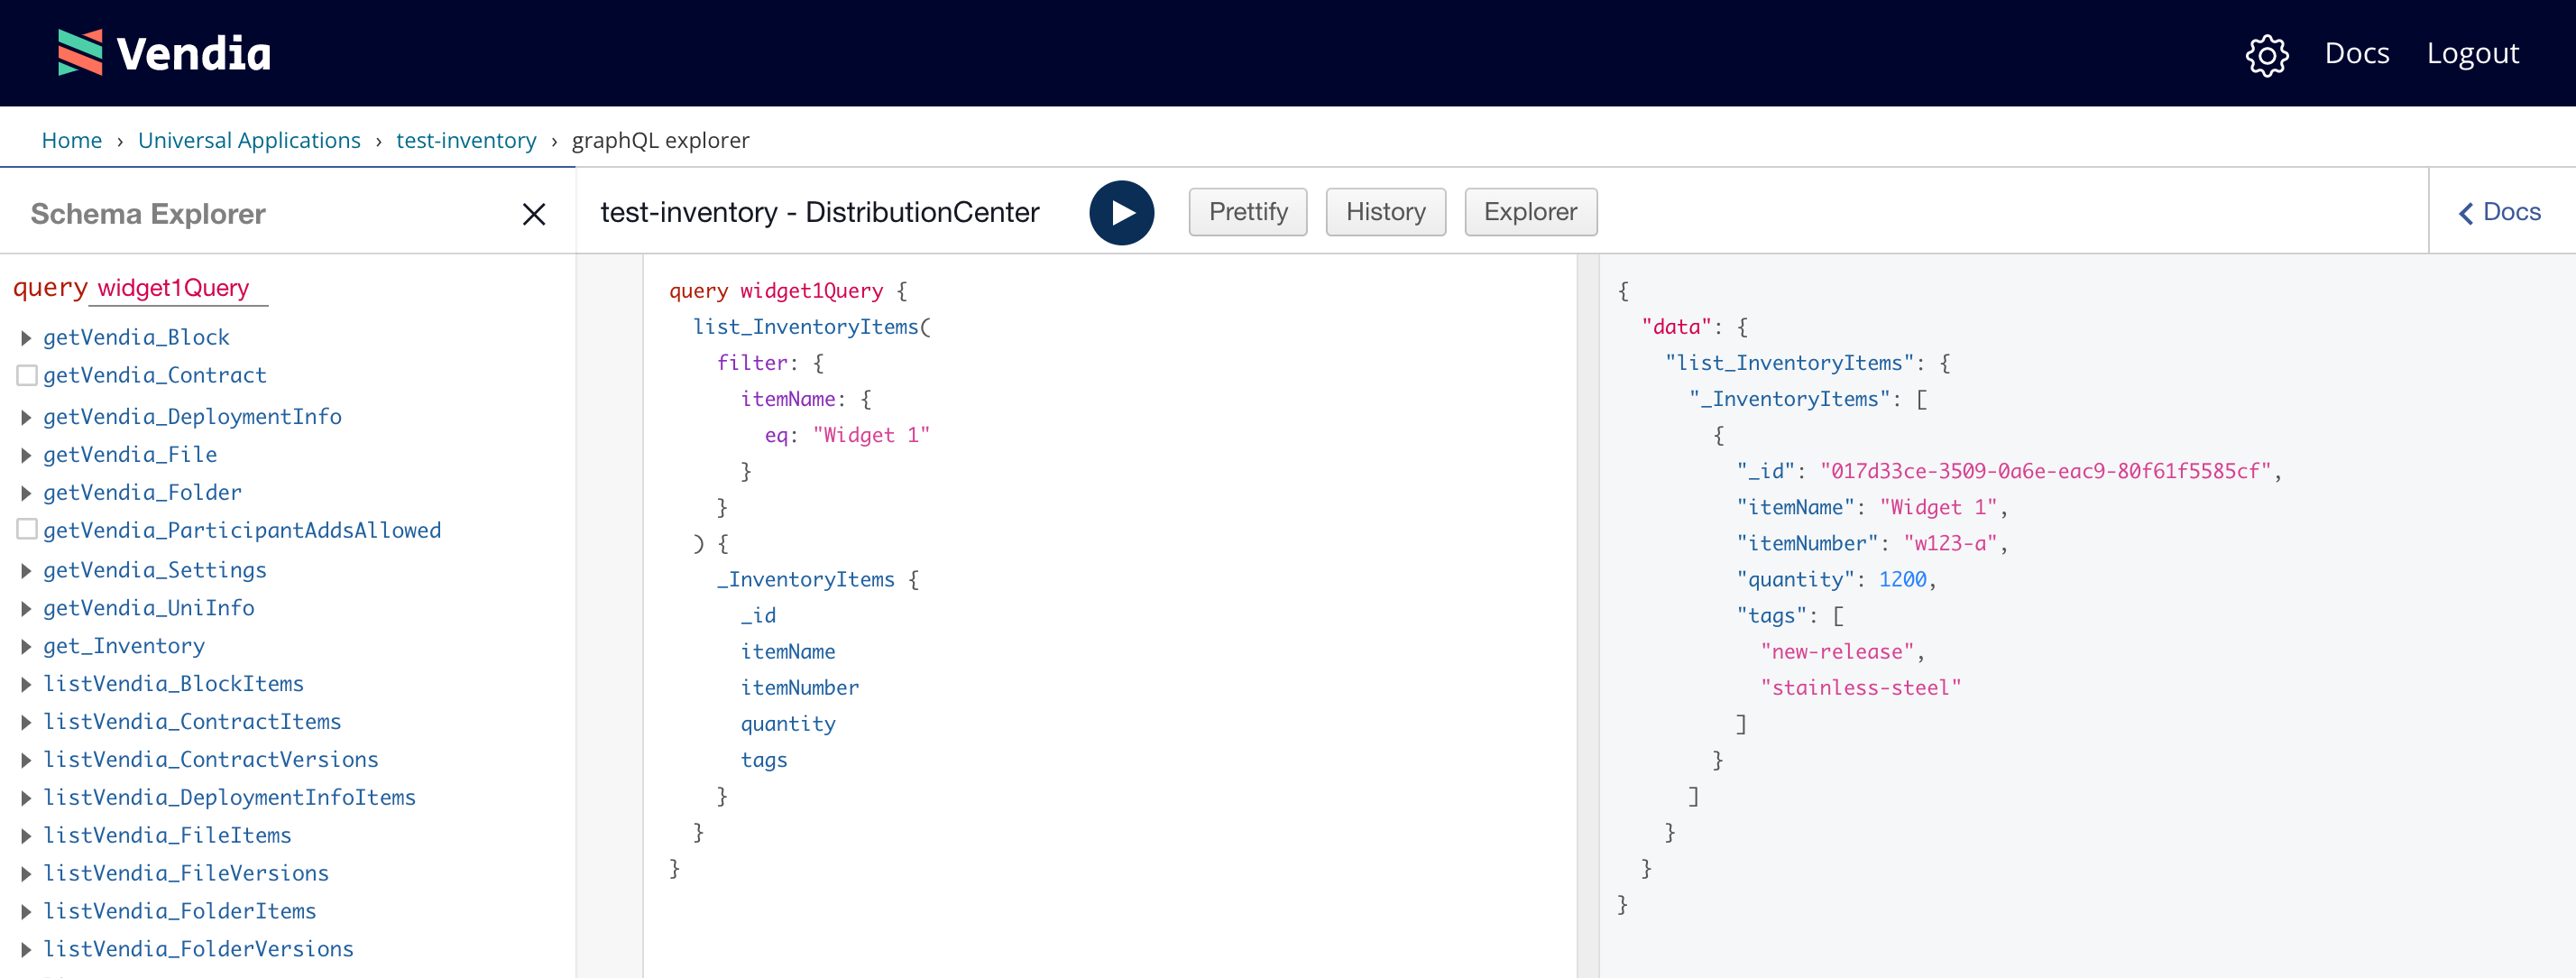
To demonstrate how our update (write) is visible to all nodes let's go to the GraphQL Explorer on DistributionCenter. We can run the same widget1Query query we ran earlier.
query widget1Query {
  list_InventoryItems(
    filter: {
      itemName: {
        eq: "Widget 1"
      }
    }
  ) {
    _InventoryItems {
      _id
      itemName
      itemNumber
      quantity
      tags
    }
  }
}
Step 7 [Optional] - Configure DistributionCenter to Receive Block Notifications
The following exercise is completely optional
Each node in a Uni can be configured to emit notifications when a new block is created. This block notification can be sent to a number of outbound integrations. In this Quick Start, we'll configure our DistributionCenter to send notifications to a AWS Lambda function. We'll show how such a notification can be used to take further action in the inventory channel - perhaps automatically triggering an order with a product manufacturer when an inventory quantity reaches a specified threshold.
NOTE: This example uses the AWS Command Line Interface version 2. Installation and configuration instructions are outside the bounds of this Quick Start.
ANOTHER NOTE: The AWS Lambda function receiving the block notification must be deployed to the same AWS region as our node.
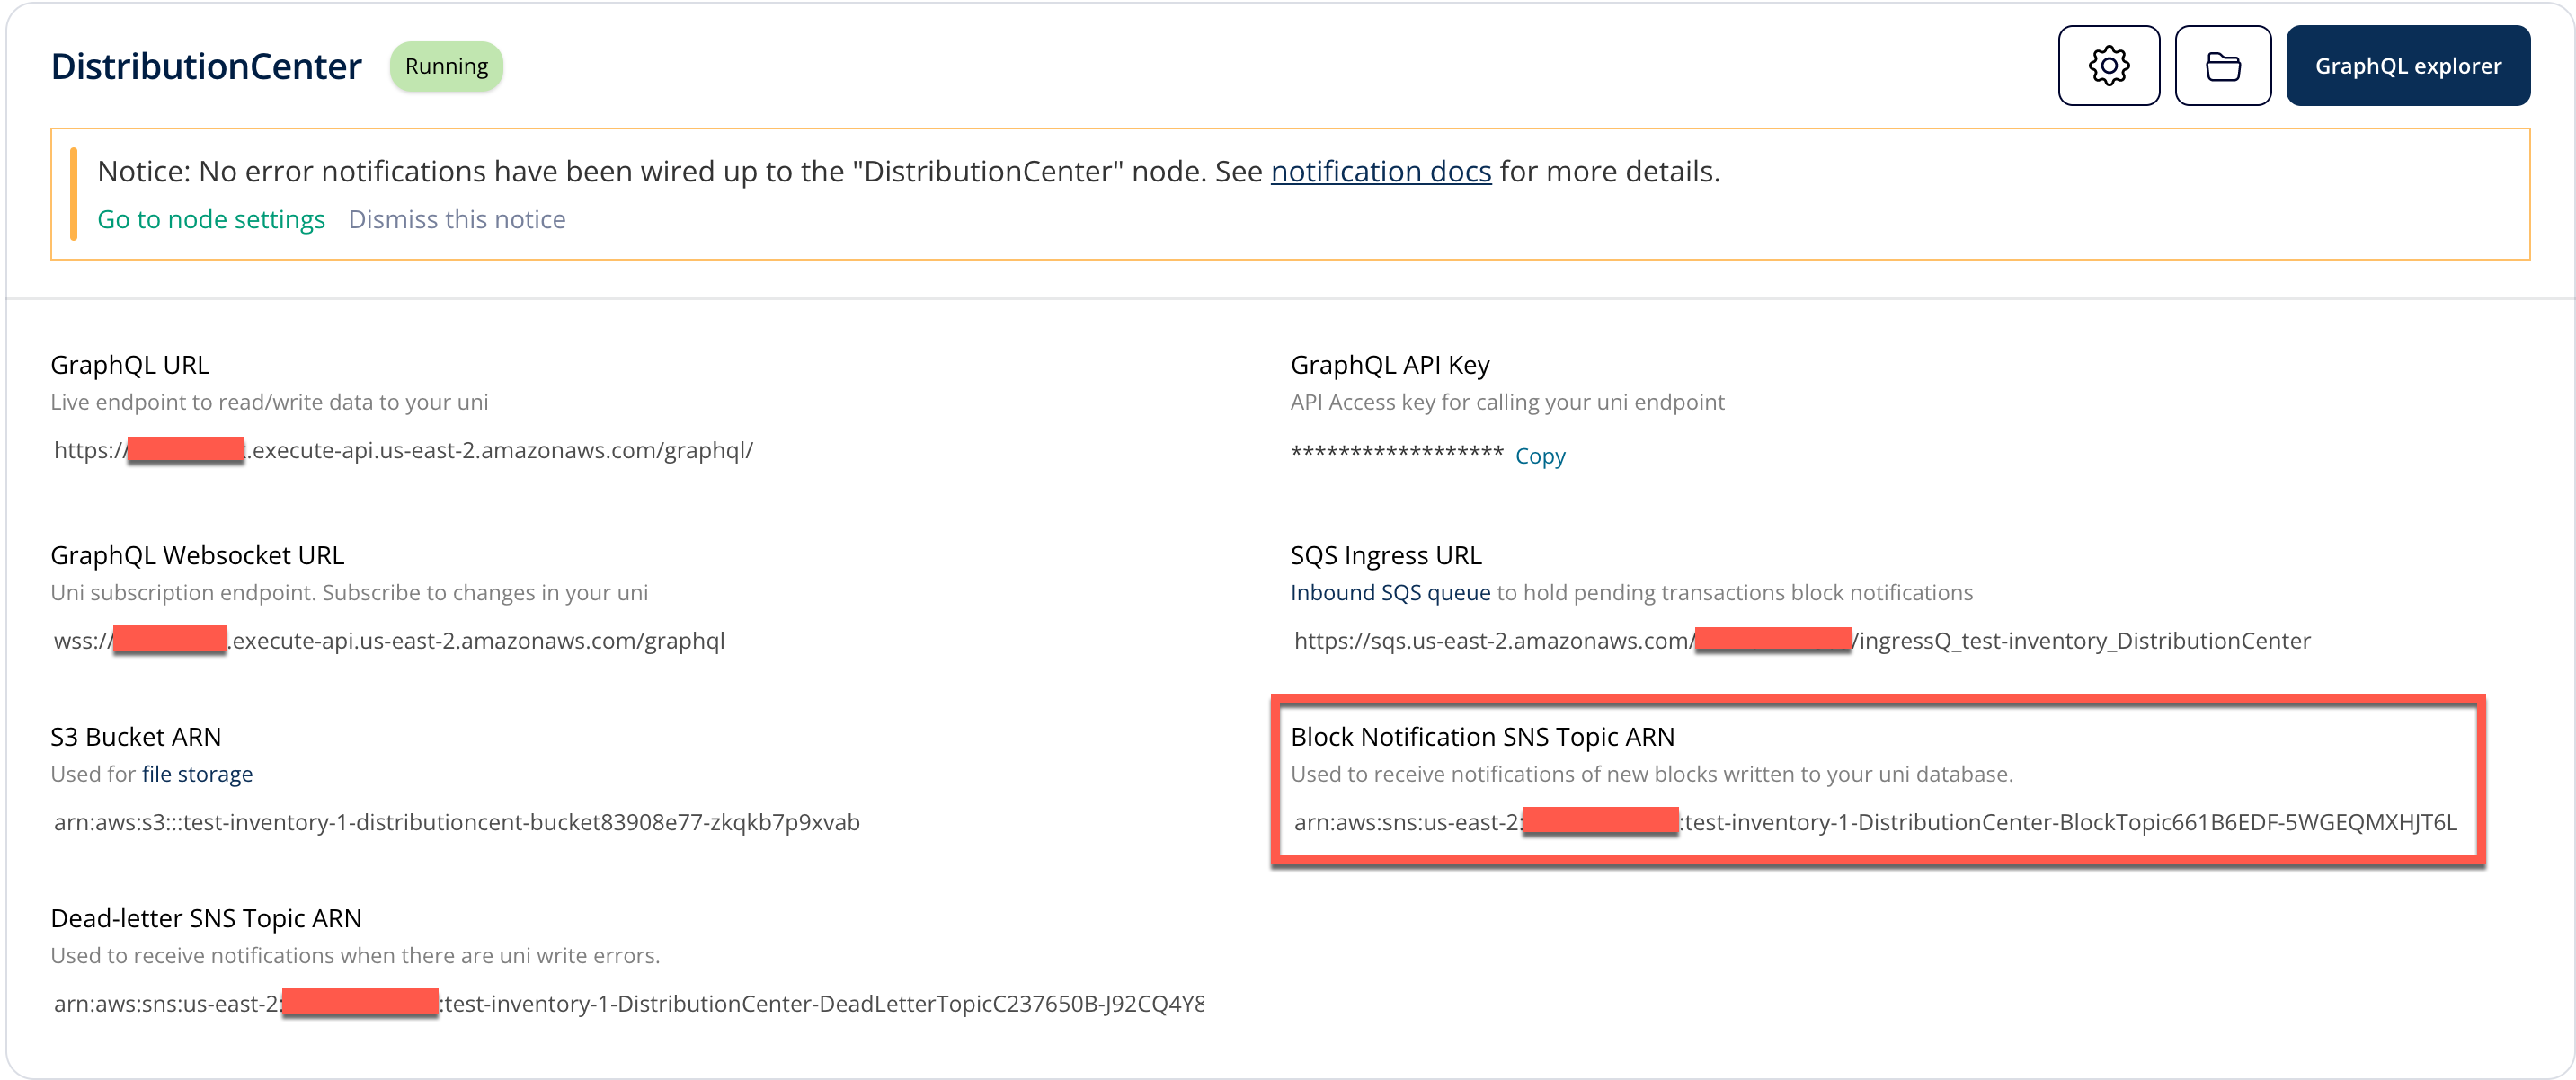
Determine the ARN of the DistributionCenter SNS Topic
Notifications from your node are emitted from a provisioned AWS SNS topic. SNS is a pub/sub messaging service. We can determine this value by looking at the Uni's settings page. In this example, we need the Notification SNS Topic ARN value from our DistributionCenter node. The ARN will have the following format:
arn:aws:sns:aws-region:your-node-aws-account-number:node-sns-topic-name
Create and Configure a AWS Lambda Function to Capture the Block Notification
We will create a Python 3.9 function with default values. The following code will capture the blockId of our newly created block. I'll refer to the function as lambda-block-function-in-your-account moving forward.
import json

def lambda_handler(event, context):
    for record in event['Records']:
        block_report = json.loads(record['Sns']['Message'])
        print(f'Here is where you could issue a getBlock query against blockId {block_report["BlockId"]} to get more detail, including the mutation that was run.')
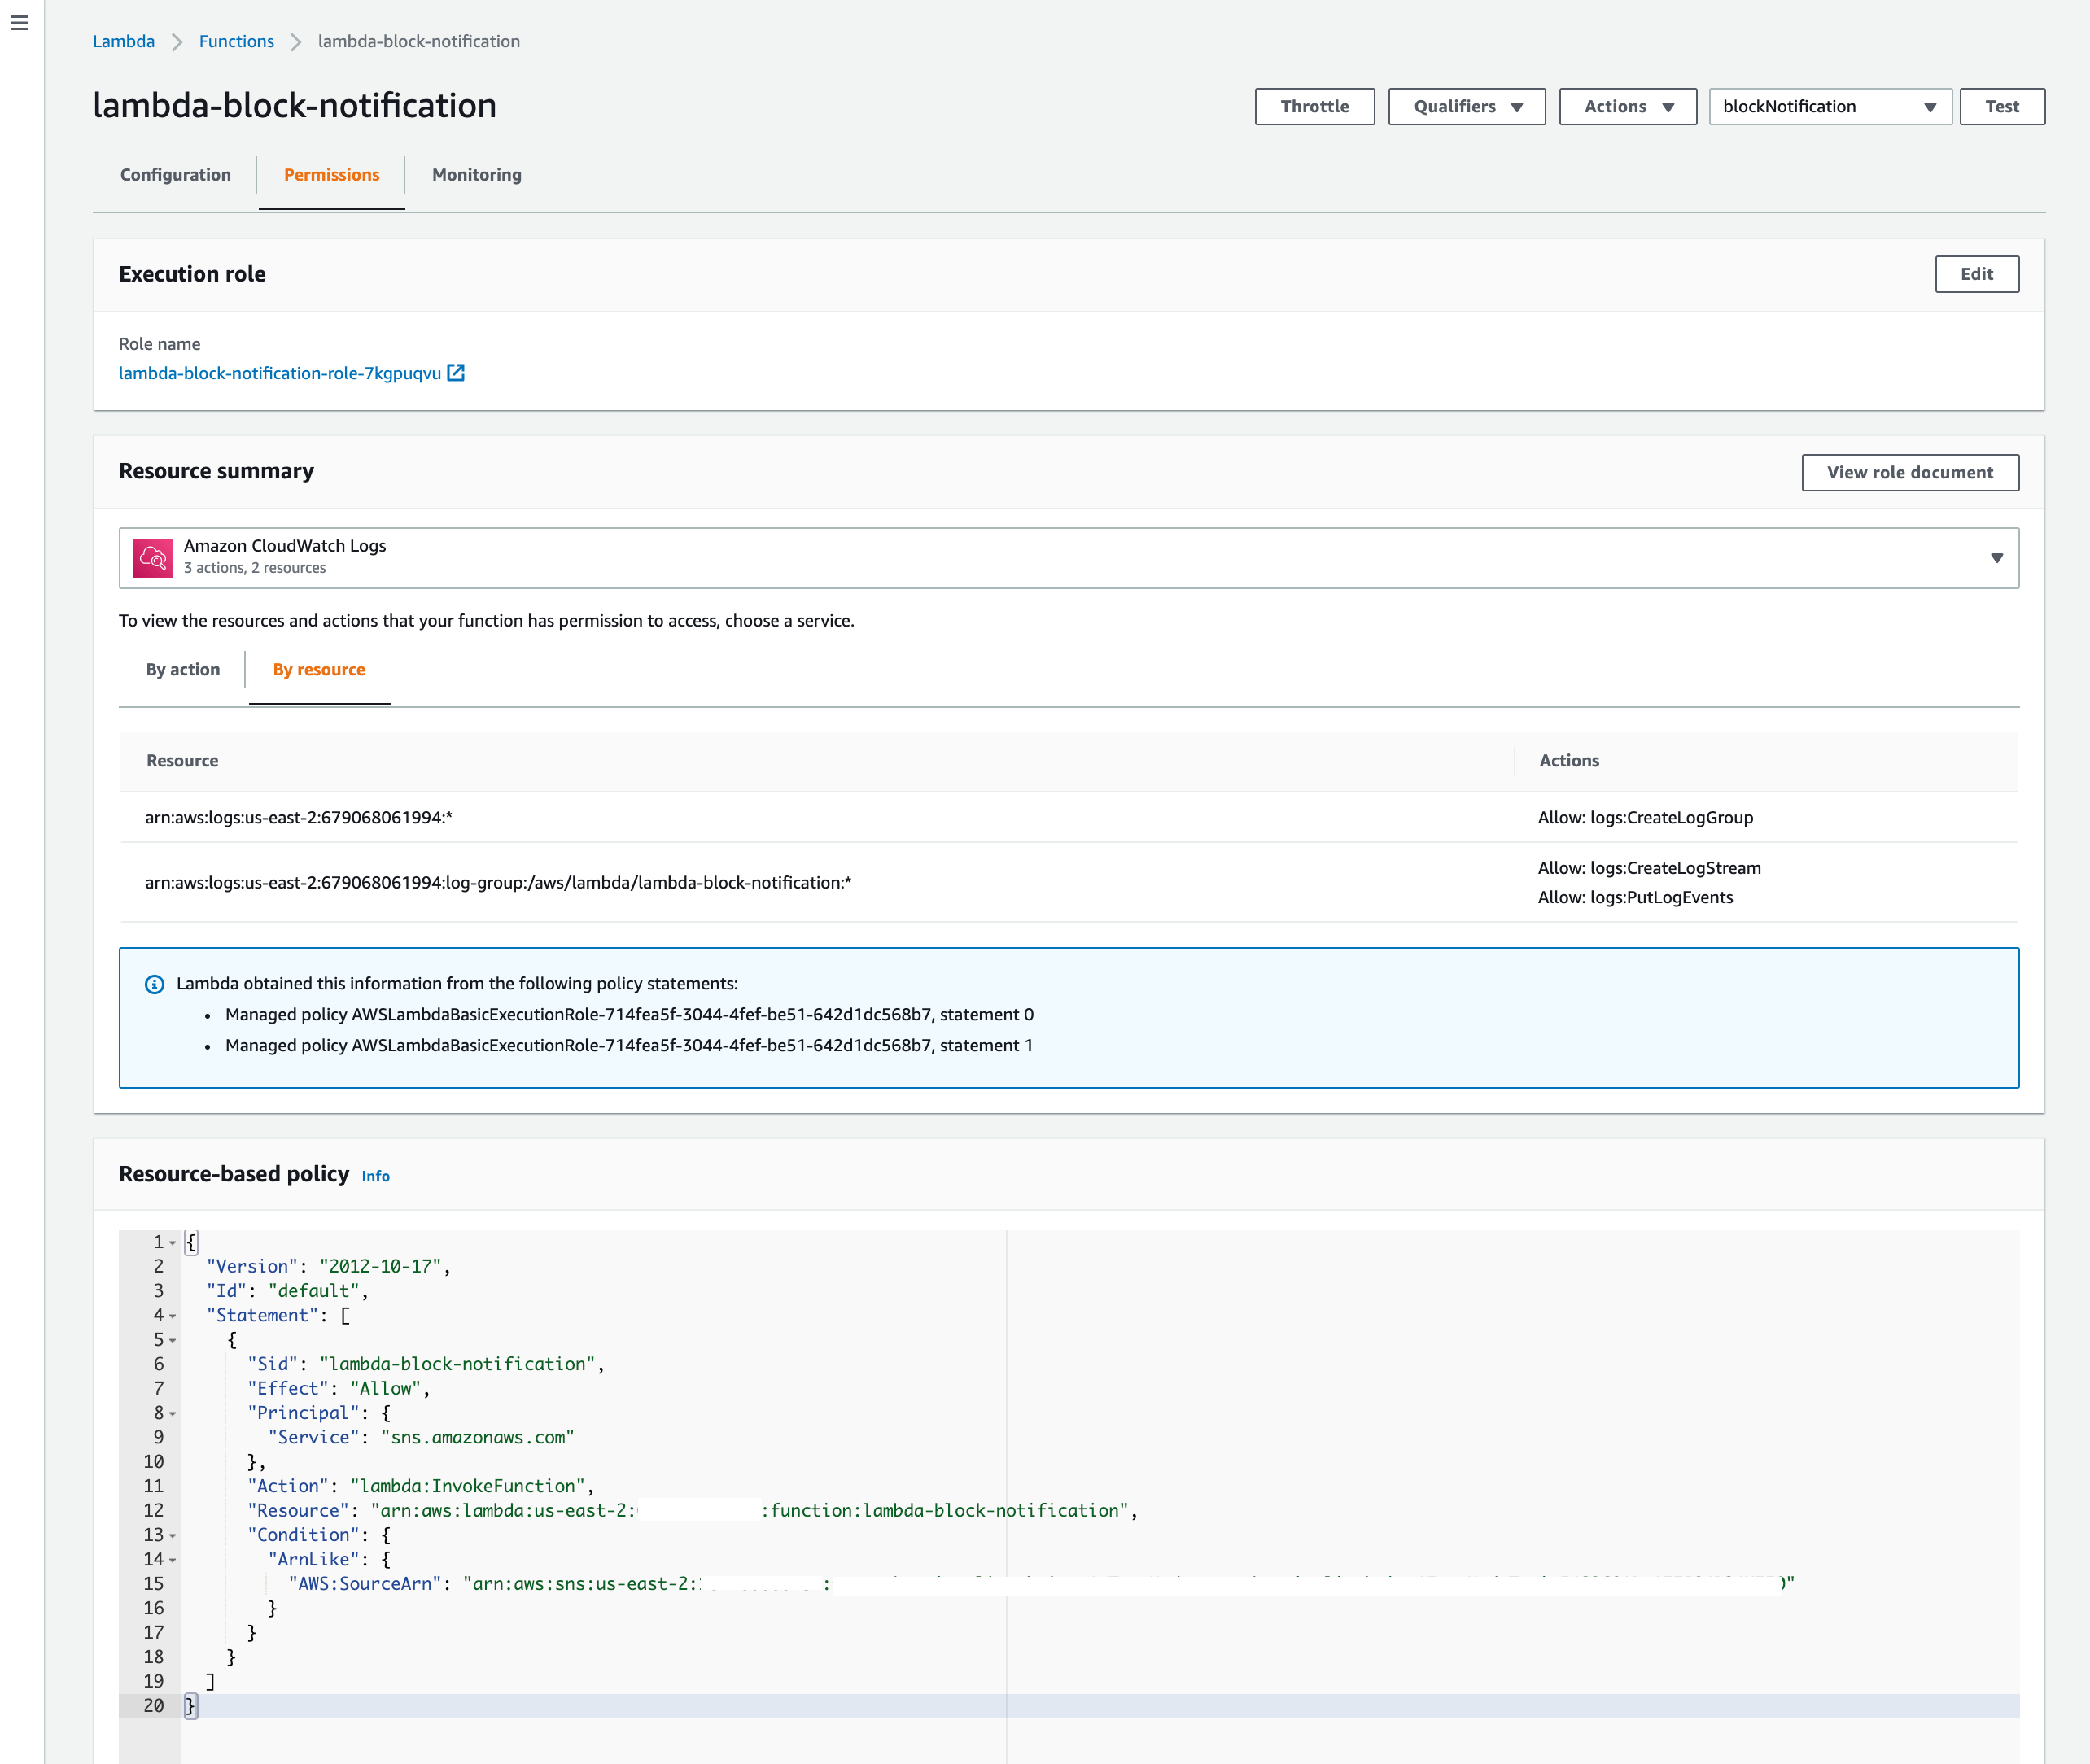
Attach a Resource-based Policy
The function lambda-block-function-in-your-account will need to allow the SNS Topic in your DistributionCenter node to trigger it. The following aws command can be used.
NOTE: There are placeholder values in this policy. Please adjust accordingly.
% aws lambda add-permission --function-name lambda-block-function-in-your-account \
--source-arn arn:aws:sns:aws-region:your-node-aws-account-number:node-sns-topic-name \
--statement-id lambda-block-notification --action "lambda:InvokeFunction" \
--principal sns.amazonaws.com  \
--query Statement --output text \
--region aws-region [--profile aws-profile-name]
{"Sid":"lambda-block-notification","Effect":"Allow","Principal":{"Service":"sns.amazonaws.com"},"Action":"lambda:InvokeFunction","Resource":"arn:aws:lambda:aws-region:your-aws-account-number:function:lambda-block-function-in-your-account","Condition":{"ArnLike":{"AWS:SourceArn":"arn:aws:sns:aws-region:your-node-aws-account-number:node-sns-topic-name"}}}
Subscribe Function to DistributionCenter SNS Topic
The following representative aws command can be used.
% aws sns subscribe --protocol lambda \
--topic-arn arn:aws:sns:aws-region:your-node-aws-account-number:node-sns-topic-name \
--notification-endpoint arn:aws:lambda:aws-region:your-aws-account-number:function:lambda-block-function-in-your-account \
--region aws-region [--profile aws-profile-name]
{
    "SubscriptionArn": "long-subscription-arn"
}
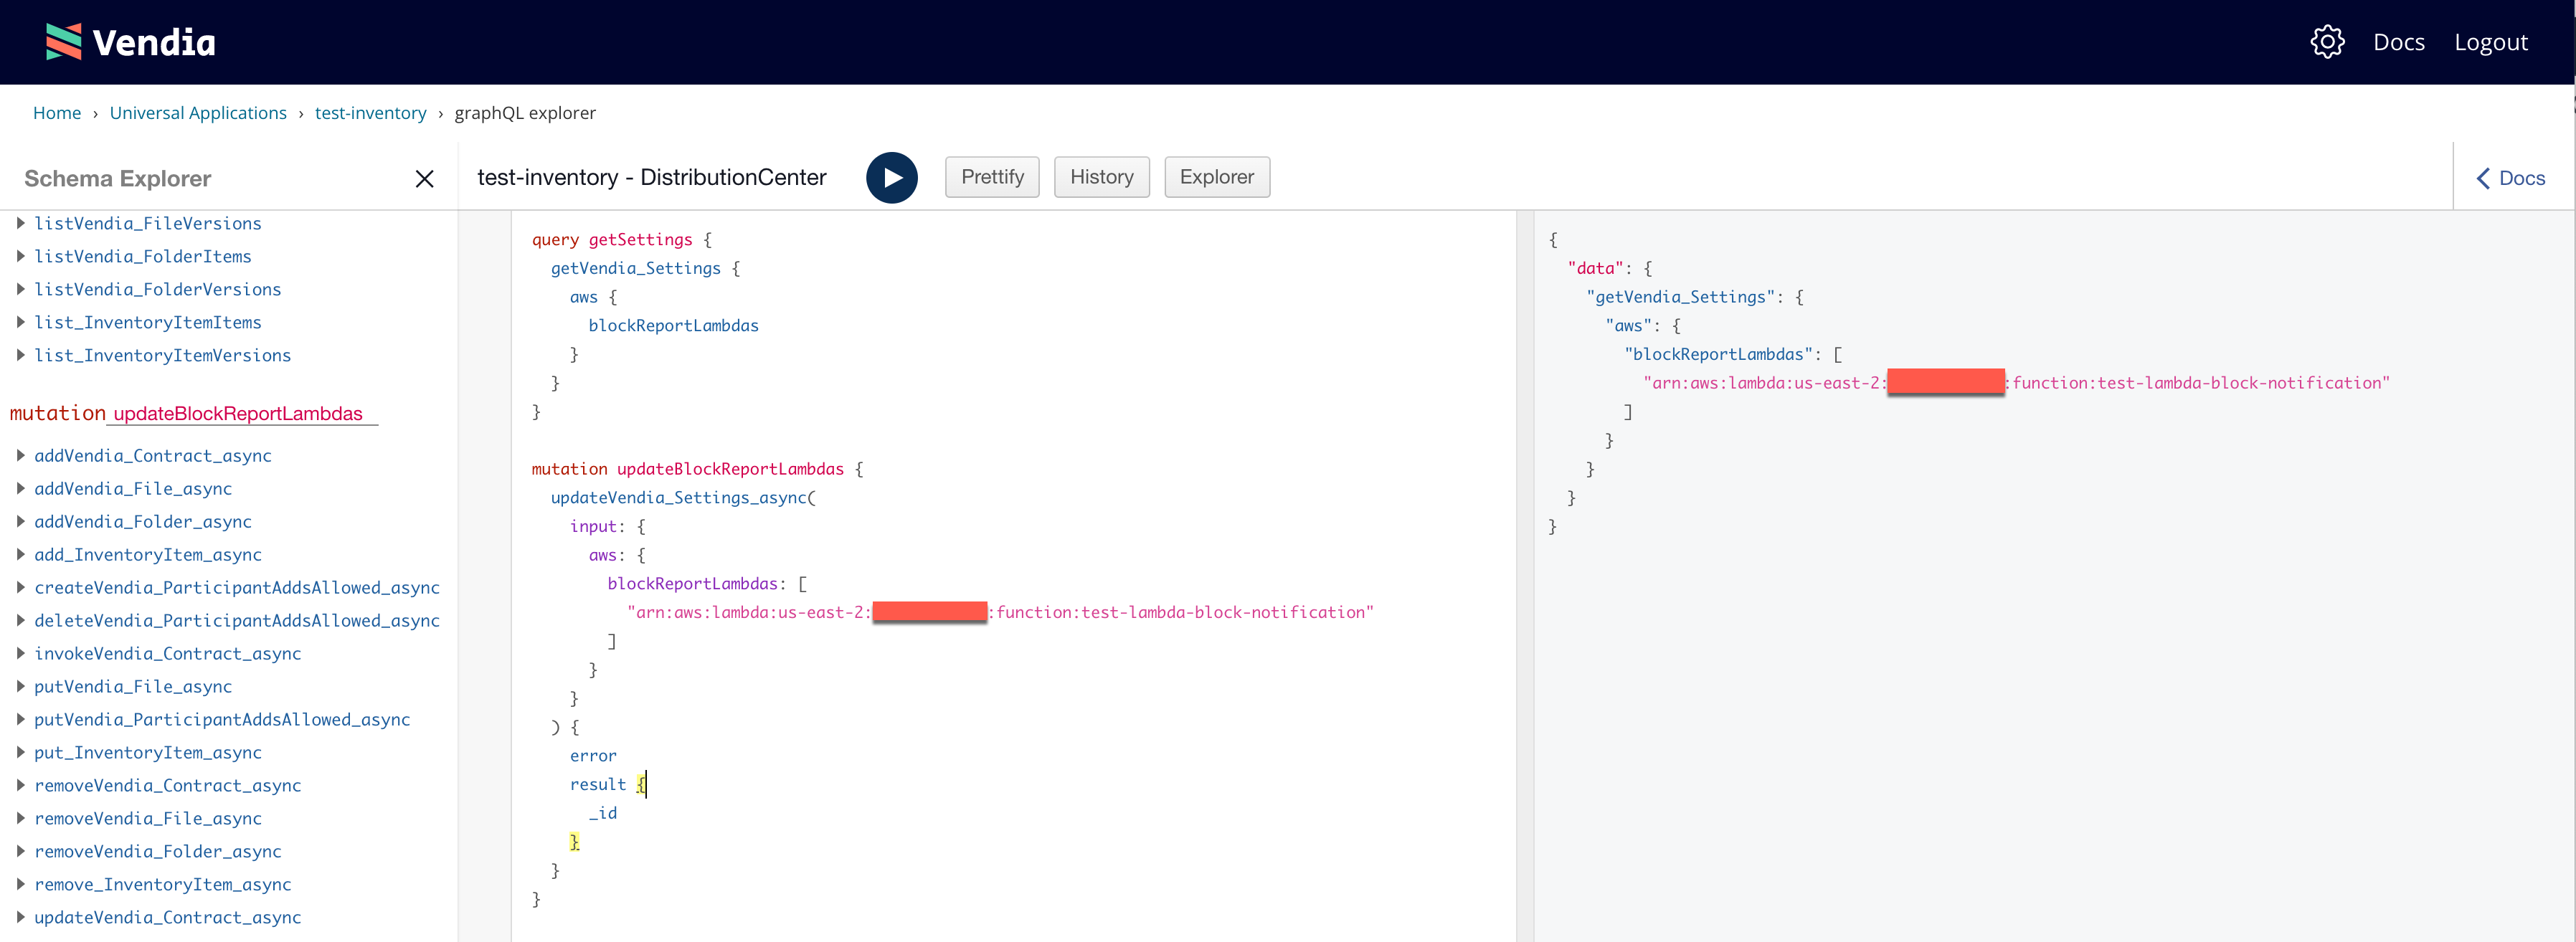
Query the DistributionCenter Node Settings
Each node has settings that are associated with it. One of the settings we have is the blockReportLambdas within the aws object of Settings. This is the one we'll update for this Quick Start.
NOTE: It is important to get all of the settings from your DistributionCenter GraphQL Explorer. When we update settings we will overwrite any existing settings so take care to record any existing values.
query getSettings {
  getVendia_Settings {
    aws {
      blockReportLambdas
    }
  }
}

Update and Verify the DistributionCenter aws_blockReportLambdas Node Setting
The following query can be used to update the node's blockReportLambdas setting. Use the Lambda function ARN of the function you created earlier.
NOTE: Adjust the query to accommodate any additional settings you already have applied.
mutation updateBlockReportLambdas {
  updateVendia_Settings(
    input: {
      aws: {
        blockReportLambdas: [
          "arn:aws:lambda:aws-region:123456789012:function:test-lambda-block-notification"
        ]
      }
    },
    syncMode: ASYNC
  ) {
    transaction {
      _id
    }
  }
Let's run the getSettings query we defined above and confirm our aws_blockReportLambdas setting is present with the proper function ARN.
query getSettings {
  getVendia_Settings {
    aws {
      blockReportLambdas
    }
  }
}
At this point, your Lambda function should receive notifications whenever new blocks are created - say when a new item is added, modified, or deleted.
Generate a New Block
Let's go ahead and create a new inventory item. Run the following mutation from the DistributionCenter GraphQL Explorer to add Awesome New Thing to our inventory so that Retailer1 can start selling it.
mutation newInventoryItem {
  add_Inventory(
    input: {
      itemName: "Awesome New Thing",
      itemNumber: "abc123",
      quantity: 2000,
      tags: [
        "awesome",
        "new",
        "thing"
      ]
    },
    syncMode: ASYNC
  ) {
    transaction {
      _id
    }
  }
}

Verify Lambda Was Triggered
Let's go back to our AWS account and open up the CloudWatch Logs log group associated with our Lambda function lambda-block-function-in-your-account. It will have the format /aws/lambda/lambda-block-function-in-your-account.
You should see the log entry with your block ID.
For more information, please refer to Real-time Block Notifications.
Step 8 - Cleanup
It is important that the Uni created in this Quick Start is destroyed to prevent any unexpected charges. You can destroy the Uni from the Vendia Share Website or with the share CLI command below.
share uni delete --uni test-inventory --force
NOTE: The --uni argument should be adjusted to reflect the name of your Uni as defined by the name property in the registration.json file.
WARNING Deleting a Uni is destructive and will remove all of its underlying data.
Summary and Next Steps
This Quick Start demonstrated the ease and speed of which Vendia Share can be leveraged to create serverless resources from a JSON Schema representation of your data model. Without providing anything other than the underlying model, Vendia Share was able to provide a strongly typed interface to your underlying data.
We invite you to explore other Quick Starts as well as you continue exploring Vendia Share.