Integrations
Once you've created a Uni, the next step is to hook it up to the rest of your application. Vendia provides a large array of options for integrating your Uni with other cloud vendor services, APIs from any vendor, and with your web and mobile clients.
Web, Mobile, and API-based Access
Every Vendia Uni comes with built-in support for API-based web, mobile, and cloud integration. Vendia offers a GraphQL-based, HTTPS protocol API that supports your custom data model with queries and updates ("mutations" in GraphQL parlance).
The URL required to interact with this service is included in the
resources returned from share get --uni <uni_name>, named httpsUrl.
To learn how to create an API Key, see our Node Authentication documentation.
share get --uni your-uni-name.unis.vendia.net
Getting your-uni-name.unis.vendia.net info...
┌─────────────────────┐
│   Uni Information   │
└─────────────────────┘
Uni Name:    your-uni-name.unis.vendia.net
Uni Status:  RUNNING
Node Count:  1
Node Info:
└─ ⬢ Node1
   ├─ name: Node1
   ├─ status: RUNNING
   └─ resources:
      ├─ graphqlApi
      │  ├─ httpsUrl https://abc123.execute-api.us-east-2.amazonaws.com/graphql/
      │  └─ websocketUrl wss://xyz345.execute-api.us-east-2.amazonaws.com/graphql
...
A simple example of using this to list a top-level, array-based data type in your model:
curl -XPOST <httpsUrl> \
    -H "Content-Type:application/graphql" \
    -H "Authorization:<apiKey>" \
    -d "{\"query\": \"query q {list_InventoryItems{_InventoryItems{name sku warehouse availableInventory}}}\"}"
Inbound Service Connectors
Vendia Share supports several additional inbound ("ingress") options beyond GraphQL mutations:
-
Lambda functions and Amazon EventBridge. You can easily use AWS Lambda functions to convert any of the dozens of AWS-provided events into GraphQL mutations, including events from S3, Aurora, and many other AWS services into transactions and then submit them to the Vendia-provided SQS queue for processing.
-
SQS queues. Vendia automatically creates an inbound SQS queue to hold pending transactions. Vendia recommends using the GraphQL endpoint when possible because it is often easier and adds a layer of type safety; however, submitting transactions directly to SQS is supported.
-
SNS topics. You can connect an SNS topic to the Vendia-provided SQS queue for automatic ingress via SNS.
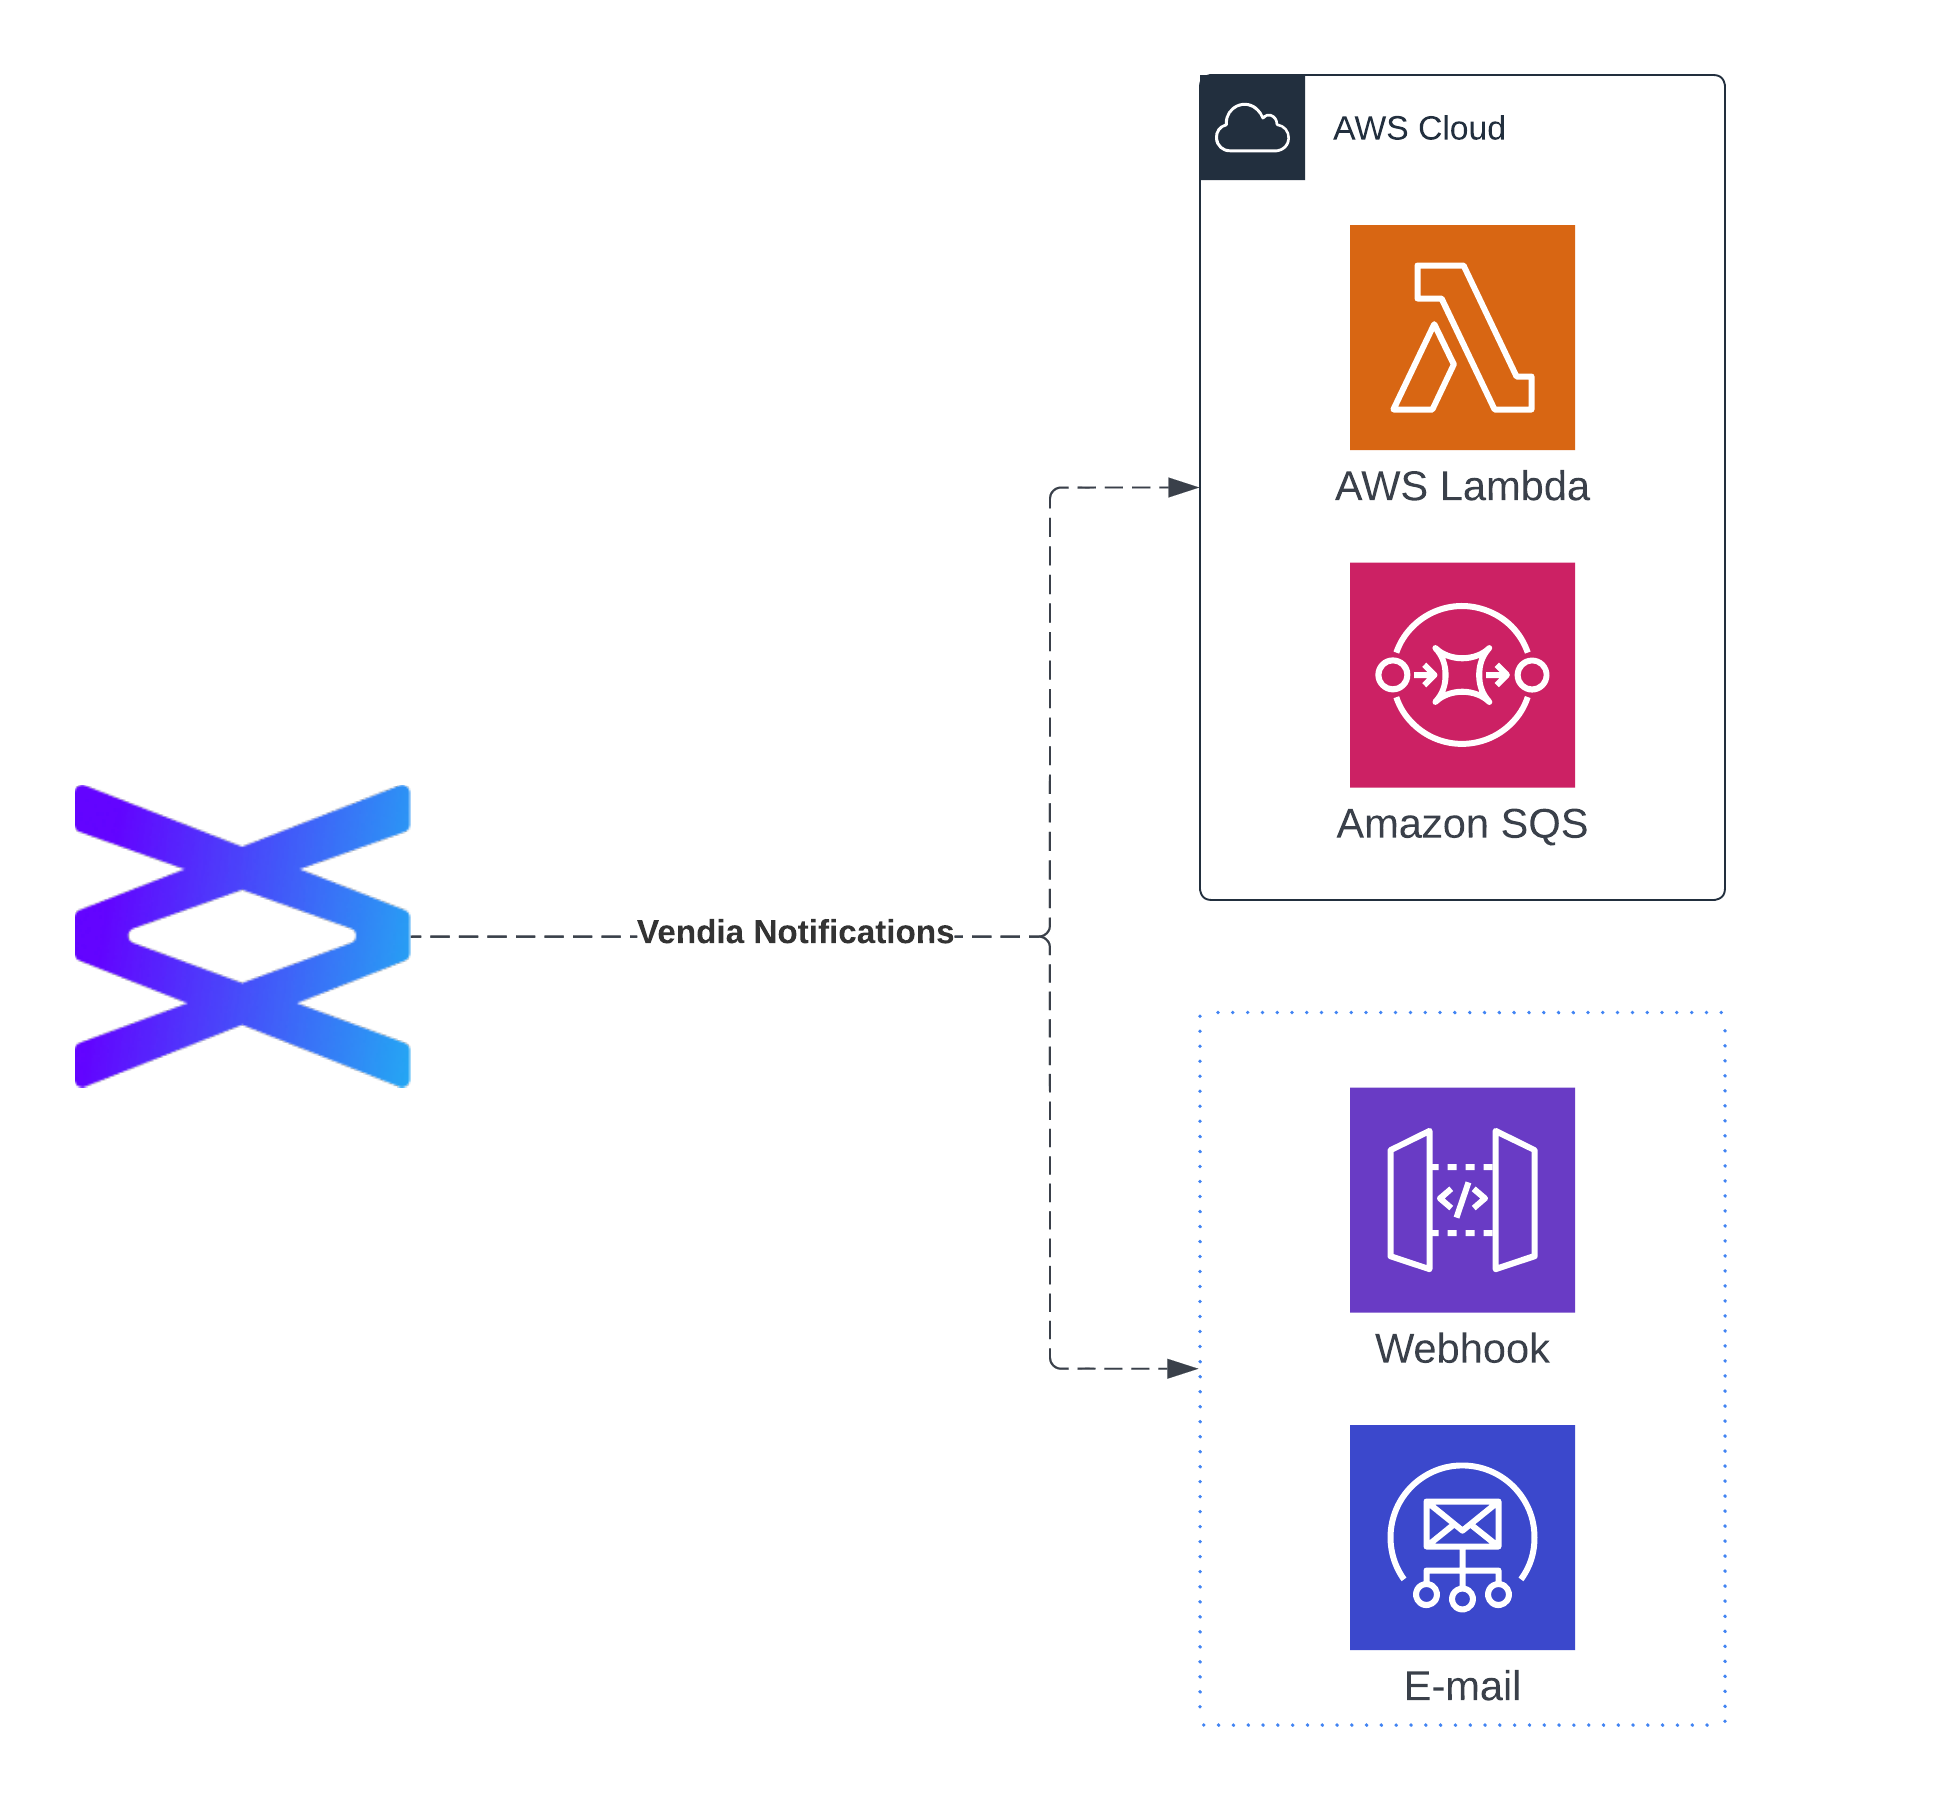
Outbound
Uni nodes can be configured to emit events for the following subscriber types:
-
HTTPS webhooks
-
Email addresses
-
AWS Lambda functions
-
Amazon SQS queues
-
Amazon Kinesis data firehoses
-
Azure Functions
-
Azure Queue Storage
Vendia supports the following notification types:
-
Real-time block notifications: Emitted when the node commits a new block. Includes a summary of the transactions included in the block.
-
Dead-letter notifications: Emitted when an asynchronous transaction cannot be committed within the retry policy. Includes the full details of the original transaction.
NOTE: Vendia node administrators should configure dead-letter notifications. Since updates to a Uni are asynchronous, the only way for an operator to know if a transaction failed is to view the output sent to the configured dead-letter endpoint. Failure to do so will result in silent failures.
NOTE: Vendia's Starter tier limits the number of real-time block notifications and dead-letter notifications received per Uni. See full details on the Pricing page.
Getting Started With Cloud-Agnostic Notifications
Vendia provides the ability to receive notifications for block creation and dead-letter events via HTTPS webhooks and email.
Configuring an HTTPS webhook subscriber
Notifications can be emitted to webhook URLs via the blockReportWebhooks and deadLetterWebhooks settings.
Sample Mutation - Configure HTTPS webhook notifications
mutation update_Webhooks {
  updateVendia_Settings(
    input: {
      blockReportWebhooks: ["https://my.block-webhook.url"]
      deadLetterWebhooks: ["https://my.dead-letter-webhook.url"]
    }
    syncMode: ASYNC
  ) {
    transaction {
      _id
    }
  }
}
Configuring an Email Subscriber
Vendia provides email notifications for block creation and dead-letter events via the blockReportEmails and deadLetterEmails settings. This is best for development, low-volume tests, and integration with legacy systems that do not support webhooks or the other methods above.
NOTE: Please confirm the subscription in email to enable events forwarding.
Sample Mutation - Configure email notifications
mutation update_Emails {
  updateVendia_Settings(
    input: {
      blockReportEmails: ["blockreports@companyxyz.com"]
      deadLetterEmails: ["deadletter@companyxyz.com"]
    }
    syncMode: ASYNC
  ) {
    transaction {
      _id
    }
  }
}
Getting Started With AWS Notifications
Before you'll be able to set up notifications for your AWS resources, you will need to determine the ARN of your Vendia node's SNS topic. The ARN is visible from your node's settings page in the web interface and will look something like arn:aws:sns:aws-region:your-node-aws-account-number:node-sns-topic-name:
- For block notifications, use the topic labelled "Block Notification SNS Topic ARN".
- For dead-letter notifications, use the topic labelled "Dead-letter SNS Topic ARN".
NOTE: Take note of the account number, embedded in the ARN at your-node-aws-account-number, as it may be required in later steps.
NOTE: The directions below use the AWS Command Line Interface.
Configuring an AWS Lambda function subscriber
You can use a Lambda-based subscription to implement custom logic or to emit notifications to other AWS services, such as streaming data services (Amazon Kinesis Data Streams or and Amazon Managed Streaming for Apache Kafka).
Detailed instructions for configuring Lambda notifications
IMPORTANT: make sure you follow ALL the steps here to the very end. After enabling the integration by updating the settings, there is still a manual subscription step that must be run in the account where the Lambda function exists to complete the setup process.
-
Create a Lambda function in your AWS account if one does not already exist. For the sake of this example the function will be referred to as
lambda-block-function-in-your-account. -
Attach a Resource-based Policy to allow your node's SNS topic to invoke the Lambda function in your account.
aws lambda add-permission \
--function-name lambda-block-function-in-your-account \
--statement-id lambda-block-notification \
--action lambda:InvokeFunction \
--principal sns.amazonaws.com \
--source-arn arn:aws:sns:aws-region:your-node-aws-account-number:node-sns-topic-name

# Successful output should look like this:
{
  "Version": "2012-10-17",
  "Id": "default",
  "Statement": [
    {
      "Sid": "lambda-block-notification",
      "Effect": "Allow",
      "Principal": {
        "Service": "sns.amazonaws.com"
      },
      "Action": "lambda:InvokeFunction",
      "Resource": "arn:aws:lambda:aws-region:your-aws-account-number:function:lambda-block-function-in-your-account",
      "Condition": {
        "ArnLike": {
          "AWS:SourceArn": "arn:aws:sns:aws-region:your-node-aws-account-number:node-sns-topic-name"
        }
      }
    }
  ]
}
- Query and record the existing node settings
View your node's existing settings. When we update settings we will overwrite any existing settings so take care to record any present values.
query getSettings {
  getVendia_Settings {
    blockReportEmails
    blockReportWebhooks
    deadLetterEmails
    deadLetterWebhooks
    resourceMapKeys
    resourceMapValues
    aws {
      blockReportFirehoses
      blockReportLambdas
      blockReportSQSQueues
      deadLetterLambdas
      deadLetterSQSQueues
      s3ReadAccounts
      dataDogMonitoring {
        ddApiKey
        ddExternalId
        ddLogEndpoint
        ddSendLogs
      }
    }
    apiSettings {
      auth {
        allowedAccounts
        authorizerArn
        authorizerType
      }
      apiKeys {
        usagePlan {
          quotaSettings {
            limit
            offset
            period
          }
          throttleSettings {
            burstLimit
            rateLimit
          }
        }
        value
      }
    }
  }
}
- Update the node setting to subscribe the Lambda function
Run the following GraphQL mutation, taking care to use your AWS Lambda function ARN as appropriate. This example sets up both block notifications, using the blockReportLambdas setting within the aws object, and dead-letter notifications, use the deadLetterLambdas setting within the aws object.
NOTE: Adjust the query to accommodate any additional settings you already have applied.
mutation update_blockReportLambdas {
  updateVendia_Settings(
    input: {
      aws: {
        blockReportLambdas: [
          "arn:aws:lambda:aws-region:your-aws-account-number:function:lambda-block-function-in-your-account"
        ]
        deadLetterLambdas: [
          "arn:aws:lambda:aws-region:your-aws-account-number:function:lambda-dead-letter-function-in-your-account"
        ]
      }
    }
    syncMode: ASYNC
  ) {
    transaction {
      _id
    }
  }
}
- Subscribe the Lambda function in your account to your node's SNS topic.
NOTE: The following AWS call must be made using the account containing the lambda function you wish to subscribe and the region your node is deployed to. Cross-region lambda invocation is supported — subscribed lambdas may reside in other regions provided your SNS subscription is created in the same region as your deployed node.
aws sns subscribe --protocol lambda \
--topic-arn arn:aws:sns:aws-region:your-node-aws-account-number:node-sns-topic-name \
--notification-endpoint arn:aws:lambda:aws-region:your-aws-account-number:function:lambda-block-function-in-your-account \
--region aws-region # eg us-east-1, eu-west-2, etc.  Should match Topic and Function region.
- Run a sample data mutation
Validate a block notification message has been sent to the configured Lambda function. There should be a full block report available.
For more information on sending Amazon SNS messages to a AWS Lambda function in a different account, please refer to AWS documentation.
Configuring an Amazon SQS queue subscriber
Vendia can emit block production and dead-letter events to an SQS queue. The queue is not strictly ordered, so consumers must rely on the block number to serialize events if they are not consumed in real time.
NOTE: The destination SQS queue must be a standard queue. AWS does not currently allow FIFO queues to be subscribed to Standard SNS topics.
NOTE: Please confirm the SQS subscription in your AWS account to enable the events forwarding.
Detailed instructions for configuring SQS Notifications
-
Create a SQS queue in your AWS account if one does not already exist.
-
Update the SQS queue's Access Policy to ensure the queue can receive both the subscription confirmation message along with subsequent notifications generated by your node's SNS topic.
The policy need to be updated to look something like this:
{
  "Version": "2008-10-17",
  "Id": "__default_policy_ID",
  "Statement": [
    {
      "Sid": "__owner_statement",
      "Effect": "Allow",
      "Principal": {
        "AWS": "your-aws-account-number"
      },
      "Action": ["SQS:*"],
      "Resource": "arn:aws:sqs:aws-region:your-aws-account-number:your-queue-receiving-notifications"
    },
    {
      "Sid": "SendMessagesFromMyNode",
      "Effect": "Allow",
      "Principal": {
        "AWS": "arn:aws:iam::your-node-aws-account-number:root"
      },
      "Action": "SQS:SendMessage",
      "Resource": "arn:aws:sqs:aws-region:your-aws-account-number:your-queue-receiving-notifications"
    },
    {
      "Sid": "AllowSubscriptionConfirmationMessage",
      "Effect": "Allow",
      "Principal": {
        "AWS": "*"
      },
      "Action": "SQS:SendMessage",
      "Resource": "arn:aws:sqs:aws-region:your-aws-account-number:your-queue-receiving-notifications",
      "Condition": {
        "ArnLike": {
          "aws:SourceArn": "arn:aws:sns:aws-region:your-node-aws-account-number:node-sns-topic-name"
        }
      }
    }
  ]
}
- Query and record the existing node settings
View your node's existing settings. When we update settings we will overwrite any existing settings so take care to record any present values.
query getSettings {
  getVendia_Settings {
    blockReportEmails
    blockReportWebhooks
    deadLetterEmails
    deadLetterWebhooks
    resourceMapKeys
    resourceMapValues
    aws {
      blockReportFirehoses
      blockReportLambdas
      blockReportSQSQueues
      deadLetterLambdas
      deadLetterSQSQueues
      s3ReadAccounts
      dataDogMonitoring {
        ddApiKey
        ddExternalId
        ddLogEndpoint
        ddSendLogs
      }
    }
    apiSettings {
      auth {
        allowedAccounts
        authorizerArn
        authorizerType
      }
      apiKeys {
        usagePlan {
          quotaSettings {
            limit
            offset
            period
          }
          throttleSettings {
            burstLimit
            rateLimit
          }
        }
        value
      }
    }
  }
}
- Update the node setting
Run the following GraphQL mutation, taking care to use your Amazon SQS ARN as appropriate. This example sets up both block notifications, using the blockReportSQSQueues setting within the aws object, and dead-letter notifications, use the deadLetterSQSQueues setting within the aws object.
NOTE: Adjust the query to accommodate any additional settings you already have applied.
mutation update_blockReportSqsQueues {
  updateVendia_Settings(
    input: {
      aws: {
        blockReportSQSQueues: [
          "arn:aws:sqs:aws-region:your-aws-account-number:your-queue-receiving-notifications"
        ]
        deadLetterSQSQueues: [
          "arn:aws:sqs:aws-region:your-aws-account-number:your-dead-letter-queue-receiving-notifications"
        ]
      }
    }
    syncMode: ASYNC
  ) {
    transaction {
      _id
    }
  }
}
- Confirm the SNS subscription
Go to the settings page of your SQS queue. You should see a message available. Poll for messages and open it. The message sent from your Vendia node's SNS topic will contain a SubscribeURL attribute. Copy and paste the value into a web browser to confirm the subscription.
NOTE: None of the node's block reports will be sent to the configured SQS queue until the subscription is confirmed.
- Run a sample data mutation
Validate a block notification message has been sent to the configured SQS queue. There should be a full block report available.
For more information on sending Amazon SNS messages to an Amazon SQS queue in a different account, please refer to AWS documentation.
Getting Started With Azure Notifications
Before attempting to set up notifications, ensure your Azure CLI session has been initialized correctly for the subscription upon which you intend to operate:
NOTE: The directions below use the use the Azure Command Line Interface; however, similar Azure PowerShell commands exist for each command utilized below if you prefer to use tool chain.
Azure CLI Session Setup
- If you haven't already done so, log into the Azure CLI.
az login
- If you already know the ID of the subscription upon which you wish to operate, simply assign the value to your variable; alternatively, you can set the subscription ID variable using the subscription's name.
ACTIVE_SUBSCRIPTION_ID="<your-azure-subscription-id>"
ACTIVE_SUBSCRIPTION_NAME="<your-azure-subscription-name>"
ACTIVE_SUBSCRIPTION_ID="$(az account list \
  --query "[? name == '$ACTIVE_SUBSCRIPTION_NAME' ].id" \
  -o tsv)"
- Ensure you are operating on the intended Azure subscription.
az account set --subscription "$ACTIVE_SUBSCRIPTION_ID"
Preparing your Azure environment for notifications
Because of the manner by which Azure's multi-tenancy identity model works, each Azure Active Directory (AAD) tenant containing Azure resources you wish to subscribe to notifications requires a service principal object to be created in configuring Azure RBAC.
Creating your Vendia AAD Service Principal
- Set up your Azure CLI session
To ensure you are operating upon the correct tenant, derive the ID of your tenant from for your subscription (as done during previous Azure CLI Session Setup).
ACTIVE_TENANT_ID="$(az account show --subscription "$ACTIVE_SUBSCRIPTION_ID" --query "tenantId" -o tsv)"
Determine the ID of the AAD Application provisioned with your Vendia node. The GUID is visible from your node's settings page in the web interface and will look something like 00000000-0000-0000-0000-000000000000.
VENDIA_AAD_APPLICATION_ID="<your-Vendia-application-id>"
- Provision a Service Principal within the AAD tenant to which your subscription belongs.
Create the service principal using the az ad CLI module and keep track of its object ID.
az ad sp create --id "$VENDIA_AAD_APPLICATION_ID"
VENDIA_SP_OBJECT_ID="$(az ad sp list --query "[].objectId" --filter "appId eq '$VENDIA_AAD_APPLICATION_ID'" -o tsv)"
Configuring an Azure Function subscriber
You can use an Azure Function triggered by Azure Event Grid to implement custom logic or to emit notifications to other Azure services, such as streaming data services (Azure Event Hubs and Azure Kafka).
NOTE: We recommend that the Azure Function App used for notifications be deployed within the same Azure region as your node.
Create your Azure Function
If you do not already have an Azure Function created, Vendia recommends using one of the examples found within Microsoft's docs, choosing the one with the supported language you prefer.
Set up RBAC
In order to deliver notifications to your Azure Function, your Vendia AAD service principal needs to have been provisioned with a role containing Microsoft.Web/sites/write IAM permissions.
- Configure your Azure CLI session with details about your Azure Function App
FUNCTION_APP_RESOURCE_GROUP="<resource-group-containing-your-function-app>"
FUNCTION_APP_NAME="<function-app-containing-your-function>"
FUNCTION_APP_ID="$(az resource show --subscription $ACTIVE_SUBSCRIPTION_ID \
  --resource-group "$FUNCTION_APP_RESOURCE_GROUP" \
  --name "$FUNCTION_APP_NAME" \
  --resource-type "Microsoft.Web/sites" \
  --query "id" -o tsv)"
- Provision the Azure Function App with a role for your service principal
This example uses built-in role Website Contributor, since it is well-documented, has reasonably-scoped privileges and comes out-of-the-box. However, any role – including custom roles – allowing Microsoft.Web/sites/write should work.
FUNCTION_APP_SP_ROLE="Website Contributor"
az role assignment create --assignee "$VENDIA_SP_OBJECT_ID" \
  --role "$FUNCTION_APP_SP_ROLE" \
  --scope "$FUNCTION_APP_ID"
Update your node's settings
- Query and record the existing node settings
View your node's existing settings. When we update settings we will overwrite any existing settings so take care to record any present values.
query getSettings {
  getVendia_Settings {
    blockReportEmails
    blockReportWebhooks
    deadLetterEmails
    deadLetterWebhooks
    resourceMapKeys
    resourceMapValues
    azure {
      defaultTenantId
      defaultSubscriptionId
      blockReportFunctions {
        resourceGroupName
        functionAppName
        functionName
      }
      blockReportQueues {
        resourceGroupName
        storageAccountName
        queueName
      }
      deadLetterFunctions {
        resourceGroupName
        functionAppName
        functionName
      }
      deadLetterQueues {
        resourceGroupName
        storageAccountName
        queueName
      }
    }
    apiSettings {
      auth {
        allowedAccounts
        authorizerArn
        authorizerType
      }
      apiKeys {
        usagePlan {
          quotaSettings {
            limit
            offset
            period
          }
          throttleSettings {
            burstLimit
            rateLimit
          }
        }
        value
      }
    }
  }
}
- Update your node's settings to subscribe your Azure Function
Run the following GraphQL mutation, taking care to use your Azure Function's parameter values as appropriate. This example sets up both block notifications, using the blockReportFunctions setting within the azure object, and dead-letter notifications, use the deadLetterFunctions setting within the azure object.
NOTE: Adjust the query to accommodate any additional settings you already have applied.
mutation update_AzureBlockReportFunctionSettings {
  updateVendia_Settings(
    input: {
      azure: {
        defaultTenantId: "your-aad-tenant-id"
        defaultSubscriptionId: "your-azure-subscription-id"
        blockReportFunctions: [
          {
            resourceGroupName: "resource-group-containing-your-functions-app"
            functionAppName: "function-app-containing-your-function"
            functionName: "your-blockreport-function"
          }
        ]
        deadLetterFunctions: [
          {
            resourceGroupName: "resource-group-containing-your-functions-app"
            functionAppName: "function-app-containing-your-function"
            functionName: "your-deadletter-function"
          }
        ]
      }
    }
    syncMode: ASYNC
  ) {
    transaction {
      _id
    }
  }
}
- Wait for your settings mutation to complete
Since the update is asynchronous, query your node's settings until you see your new configuration reflected.
query getAzureBlockReportFunctionsSettings {
  getVendia_Settings {
    azure {
      defaultTenantId
      defaultSubscriptionId
      blockReportFunctions {
        resourceGroupName
        functionAppName
        functionName
      }
      deadLetterFunctions {
        resourceGroupName
        functionAppName
        functionName
      }
    }
  }
}
- Run a sample data mutation
Validate a block notification message has been sent to the configured Azure Function. There should be a full block report available.
Configuring an Azure Queue Storage subscriber
Vendia can emit block production and dead-letter events to Azure Queue Storage. The queue is not strictly ordered, so consumers must rely on the block number to serialize events if they are not consumed in real time.
NOTE: We recommend that the Azure Storage Account used for notifications be deployed within the same Azure region as your node.
Create your Azure Queue Storage
Microsoft's docs provide examples of how to create a storage account, while queues can be created in a myriad of ways: via Azure Portal, via Azure CLI, via PowerShell, or programmatically using the Azure SDK for the language of your choice.
Set up RBAC
In order to deliver notifications to your Azure Queue Storage, your Vendia AAD service principal needs to have been provisioned with a role containing Microsoft.Storage/storageAccounts/write IAM permissions.
- Configure your Azure CLI session with details about your Azure Storage Account
STORAGE_ACCOUNT_RESOURCE_GROUP="<name of the resource group containing your storage account>"
STORAGE_ACCOUNT_NAME="<name of the storage account containing your queue>"
STORAGE_ACCOUNT_ID=$(az resource show --subscription $ACTIVE_SUBSCRIPTION_ID \
  --resource-group "$STORAGE_ACCOUNT_RESOURCE_GROUP" \
  --name "$STORAGE_ACCOUNT_NAME" \
  --resource-type "Microsoft.Storage/storageAccounts" \
  --query "id" -o tsv)
- Provision the Azure Storage Account with a role for your service principal
This example uses built-in role Storage Account Contributor, since it is well-documented, has reasonably-scoped privileges and comes out-of-the-box. However, any role – including custom roles – allowing Microsoft.storage/storageAccounts/write should work.
STORAGE_ACCOUNT_SP_ROLE="Storage Account Contributor"
az role assignment create --assignee "$VENDIA_SP_OBJECT_ID" \
  --role "$STORAGE_ACCOUNT_SP_ROLE" \
  --scope "$STORAGE_ACCOUNT_ID"
Update your node's settings
- Query and record the existing node settings
View your node's existing settings. When we update settings we will overwrite any existing settings so take care to record any present values.
query getSettings {
  getVendia_Settings {
    blockReportEmails
    blockReportWebhooks
    deadLetterEmails
    deadLetterWebhooks
    resourceMapKeys
    resourceMapValues
    azure {
      defaultTenantId
      defaultSubscriptionId
      blockReportFunctions {
        resourceGroupName
        functionAppName
        functionName
      }
      blockReportQueues {
        resourceGroupName
        storageAccountName
        queueName
      }
      deadLetterFunctions {
        resourceGroupName
        functionAppName
        functionName
      }
      deadLetterQueues {
        resourceGroupName
        storageAccountName
        queueName
      }
    }
    apiSettings {
      auth {
        allowedAccounts
        authorizerArn
        authorizerType
      }
      apiKeys {
        usagePlan {
          quotaSettings {
            limit
            offset
            period
          }
          throttleSettings {
            burstLimit
            rateLimit
          }
        }
        value
      }
    }
  }
}
- Update the node setting to subscribe your Azure Queue Storage
Run the following GraphQL mutation, taking care to use your Azure Queue Storage's parameter values as appropriate. This example sets up both block notifications, using the blockReportQueues setting within the azure object, and dead-letter notifications, use the deadLetterQueues setting within the azure object.
NOTE: Adjust the query to accommodate any additional settings you already have applied.
mutation update_AzureBlockReportQueueSettings {
  updateVendia_Settings(
    input: {
      azure: {
        defaultTenantId: "your-aad-tenant-id"
        defaultSubscriptionId: "your-azure-subscription-id"
        blockReportQueues: [
          {
            resourceGroupName: "resource-group-containing-your-storage-account"
            storageAccountName: "storageaccountcontainingyourqueue"
            queueName: "your-blockreport-queue"
          }
        ]
        deadLetterQueues: [
          {
            resourceGroupName: "resource-group-containing-your-storage-account"
            storageAccountName: "storageaccountcontainingyourqueue"
            queueName: "your-deadletter-queue"
          }
        ]
      }
    }
    syncMode: ASYNC
  ) {
    transaction {
      _id
    }
  }
}
- Ensure your settings saved
Since the update is an asynchronous mutation, query your node's settings for your new configuration.
query getAzureBlockReportQueueSettings {
  getVendia_Settings {
    azure {
      defaultTenantId
      defaultSubscriptionId
      blockReportQueues {
        resourceGroupName
        storageAccountName
        queueName
      }
      deadLetterQueues {
        resourceGroupName
        storageAccountName
        queueName
      }
    }
  }
}
- Run a sample data mutation
Validate a block notification message has been sent to the configured Azure Queue Storage. There should be a full block report available.
Making Use of Block Reports
When data in a Uni is modified, an update is made to the ledger to capture this information. Customers can take advantage of outbound integrations and take action based on these updates. In this section, we'll explore the contents of a block notification along with how to process the information in them.
Block Notification Contents
Let's assume you have configured an output integration. When a new block is created, your integration receives a notification.
{
  "blockId": "000000000000123",
  "blockHash": "block_hash",
  "mutations": [{ "_id": "transaction_Id", "_owner": "NodeOwner" }],
  "part": 1,
  "totalParts": 1
}
Making Use of Block Information
Once our integration receives notification that a block has been created, the integration must then query the block. Below is a sample query that can be used to surface information about the mutation used to create the block.
query q {
  getVendia_Block(id: "000000000000123") {
    previousBlockId
    blockHash
    previousBlockHash
    commitTime
    transactions {
      mutations
      _owner
      submissionTime
    }
  }
}
This sample query will return relevant information about mutations recorded in the block.
{
  "data": {
    "getVendia_Block": {
      "previousBlockId": "000000000000123",
      "blockHash": "97d85748a39afc104573bf09f69fa388a5e9c6e922b9816508c8ef3ab75dfa38",
      "previousBlockHash": "518d1cc60efc14645f4dd54805ab7a78ef90bd06b3e1280c2d8c111c70322cc1",
      "commitTime": "2021-11-12T16:42:58.127872+00:00",
      "transactions": [
        {
          "mutations": [
            "updateSelf_Shipment(id:\"017d1206-7881-4279-995a-e4176d8f223a\",input: {delivered: true, lastUpdated: \"2020-12-02T14:10:02Z\", location: [47.3741, -122.031]}){error}"
          ],
          "_owner": "shipper",
          "submissionTime": "2021-11-12T16:42:50.691102+00:00"
        }
      ]
    }
  }
}
Based upon the contents of the block - the mutations in the list of transactions or perhaps the _owner - you can take action. What kind of action? Perhaps you need to instruct a Enterprise Resource Planning (ERP) application to release funds when a shipment is received in good order. Maybe you need to make a post to social media that an event has been scheduled by a partner. There is really no limit to what your integration can do.
Next Steps
Developing and Using Unis
Defining Your Data Model
Learning More
Application Performance Monitoring (APM) Integrations
Terms and Definitions