Real-Time cross-cloud data sharing
Updates
This post has been updated since it was first published.
- 01/11/2022 - Check out this comprehensive code example, from which the code snippets in this post were taken.
Overview
Vendia Share is the real-time data cloud for rapidly building applications that securely share data across departments, companies, and clouds. As we recently announced, Vendia Share now includes functionality that makes integrating real-time data with Microsoft Azure services easier than ever before.
The maturity of real-time data sharing capabilities varies widely among organizations. Less mature organizations still depend heavily on manual or batch processing for internal operations. More mature organizations have created real-time, event-driven solutions for internal operations. To date, the maturity of an organization's real-time data sharing capabilities for internal operations had little bearing on its real-time data sharing capabilities for external operations with partners.
For example, consider Organization A that adopts an event-driven microservices architecture for core systems and Organization B that still relies on error-prone batch processes. Both organizations strive to share data in real time, but Organization B lacks the in-house experience to build such a system. The value of Organization A's investment is limited as soon as it attempts to collaborate with Organization B. Whether the interaction among those organizations takes the form of periodic SFTP transfers (Organization B's only option) or point-to-point API interactions (Organization A's preference), neither duplicates the real-time, event-driven interactions from a shared source of truth which both organizations want to achieve.
As partner ecosystems become central to unlocking new business opportunities, it's imperative that organizations have an easy path toward joint real-time, event-driven solutions, regardless of their real-time data sharing maturity. Further, it's equally important to allow organizations to make the most of its existing in-house real-time data sharing capabilities. For example, collaboration between Organization A and Organization B should be able to leverage the substantial investment Organization A made to modernize its in-house systems. More often than not, this means working seamlessly across organizational boundaries and across cloud service providers (CSPs), as it's common for organizations to adopt different CSPs while still wanting to work effectively together.
Vendia Share addresses those imperatives through the concept of a Universal Application (or Uni for short). A Uni allows each party (what we call a Uni participant) to work from a single source of truth, removing the complexity of sharing data among parties while also streamlining the use of the data as it's shared. "As it's shared" means applying real-time actions to real-time data, using an event-driven programming model. It also means working across organizations no matter their choice and investment in differing CSPs.
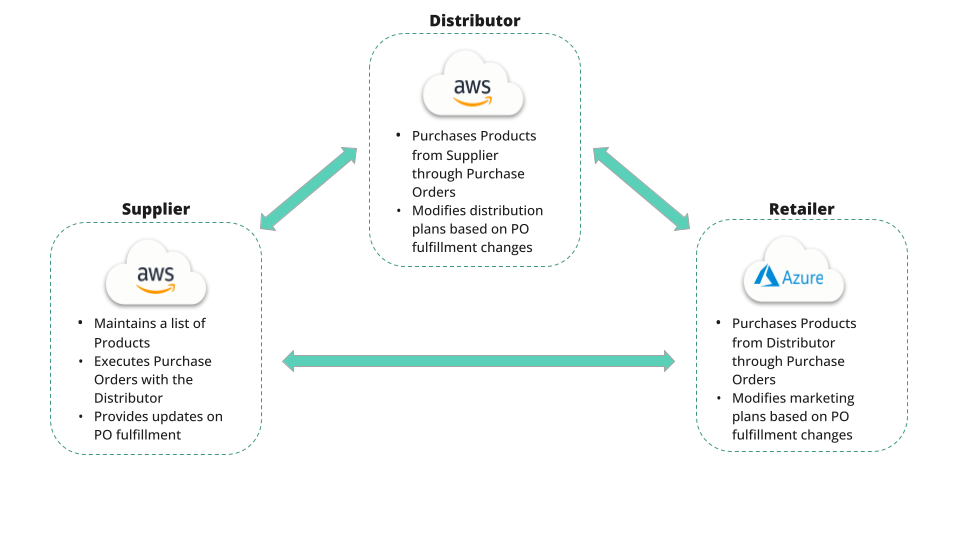
In this blog post, we'll highlight the value of Vendia Share's new Azure capabilities from both a cross-cloud data sharing and event-driven programming perspective. Consider the case of a Supplier (on AWS), working through a Distributor (on AWS), who delivers goods to a Retailer (on Azure). When the Supplier makes an adjustment (say by changing the anticipated fulfilment date of an existing purchase order), both the Distributor and the Retailer would like to be made aware (and take action) immediately.

In our example, we'll start by modifying the fulfillment date of a purchase order by executing a GraphQL mutation against the Supplier's node in the Uni. That, in turn, will cause an event to flow to Retailer's node in the Uni and then to the Retailer's Azure environment, delivered to Azure Event Grid. From there, an event-driven Azure Function within the Retailer's Azure environment will process the delivered event.
Now let's get started!
Step 0 - Prerequisites
To replicate the Retailer's environment on Azure, we'll first need to:
- Create a Vendia Share account
- Create an Azure account
- Install the Azure Command Line Interface (CLI)
- Install the Vendia Command Line Interface (CLI)
Step 1 - Create a Cross-Cloud Vendia Uni
The first step is to create a cross-cloud Uni for this example, with the following participants:
- A
SupplierAWS Node (us-east-2) - A
DistributorAWS Node (us-west-2) - A
RetailerAzure Node (eastus)
This is accomplished using a registration.json file that defines one Node per Uni participant. Each Node definition includes a csp (short for cloud service provider) and a region, which is unique to each CSP. Using the example below, we're able to provision a multi-cloud, multi-region Uni that connects all three participants in just about 5 minutes.
Note: Please refer to our docs for more information about the modeling Uni participants using a registration file or modeling data using a schema file.
-
Save the following as
registration.json. Replace<UNI_NAME>with a name for your Uni and each<USER_ID>with the email address associated with your Vendia account.registration.json Contents
{ "name": "<UNI_NAME>", "schema": "inventory.schema.json", "initState": "initial-state.json", "nodes": [ { "name": "Supplier", "userId": "<USER_ID>", "csp": "aws", "region": "us-east-2", "settings": { "apiSettings": { "auth": { "authorizerType": "API_KEY" } } } }, { "name": "Distributor", "userId": "<USER_ID>", "csp": "aws", "region": "us-west-2", "settings": { "apiSettings": { "auth": { "authorizerType": "API_KEY" } } } }, { "name": "Retailer", "userId": "<USER_ID>", "csp": "azure", "region": "eastus", "settings": { "apiSettings": { "auth": { "authorizerType": "API_KEY" } } } } ] } -
Save the following file in the same directory as the last file as
inventory.schema.jsoninventory.schema.json Contents
{ "$schema": "http://json-schema.org/draft-07/schema#", "$id": "http://vendia.com/schemas/demos/track-and-trace.json", "title": "Inventory Management", "description": "Managing inventory among supplier, distributor, and retailer", "type": "object", "properties": { "Product": { "description": "Product information", "type": "array", "items": { "type": "object", "properties": { "name": { "description": "Product name", "type": "string" }, "description": { "description": "Product description", "type": "string" }, "sku": { "description": "Product sku", "type": "string" }, "price": { "description": "Product price", "type": "number" }, "supplierId": { "description": "Supplier identifier", "type": "string" } } } }, "PurchaseOrder": { "description": "Purchase order information", "type": "array", "items": { "type": "object", "properties": { "orderId": { "description": "Order identifier", "type": "string" }, "items": { "type": "array", "items": { "type": "object", "properties": { "sku": { "description": "Product sku", "type": "string" }, "quantity": { "description": "Quantity purchased", "type": "integer" } } } }, "created": { "description": "When order was placed", "type": "string", "format": "date-time" }, "updated": { "description": "When order was last updated", "type": "string", "format": "date-time" }, "expected": { "description": "When order is expected to be fulfilled", "type": "string", "format": "date-time" }, "fulfilled": { "description": "When order was actually fulfilled", "type": "string", "format": "date-time" } } } } } } -
Save the following file in the same directory as the previous files as
initial-state.jsoninitial-state.json Contents
{ "Product": [ { "name": "Widget 123", "description": "Description of Widget 123", "sku": "WDGT123", "price": 49.99, "supplierId": "Supplier123" }, { "name": "Widget 456", "description": "Description of Widget 456", "sku": "WDGT456", "price": 149.99, "supplierId": "Supplier123" }, { "name": "Widget 789", "description": "Description of Widget 789", "sku": "WDGT789", "price": 249.99, "supplierId": "Supplier123" } ], "PurchaseOrder": [ { "orderId": "Supplier123-Distributor123-ABCDEFG", "items": [ { "sku": "WDGT123", "quantity": 10 } ], "created": "2021-11-20T09:15:44Z", "expected": "2021-12-03T00:00:00Z", "fulfilled": "2021-12-02T15:15:15Z" }, { "orderId": "Supplier123-Distributor123-BCDEFGH", "items": [ { "sku": "WDGT456", "quantity": 10 }, { "sku": "WDGT789", "quantity": 5 } ], "created": "2021-12-02T14:10:02Z", "expected": "2021-12-12T00:00:00Z" }, { "orderId": "Distributor123-Retailer123-ABCDEFG", "items": [ { "sku": "WDGT123", "quantity": 1 }, { "sku": "WDGT456", "quantity": 5 }, { "sku": "WDGT789", "quantity": 2 } ], "created": "2021-12-05T12:12:03Z", "expected": "2021-12-15T12:00:00Z" } ] } -
After moving back to your terminal, change directory into the directory containing the files created above.
-
Login to the Share CLI
share auth login
-
Create a Uni
share uni create --config registration.json
-
Wait about 5 minutes for the Uni to be created
share uni get --uni <UNI_NAME>
-
Proceed only after the Uni state has transitioned to
RUNNINGUni Get Output
Getting <UNI_NAME> info...
┌─────────────────────┐
│   Uni Information   │
└─────────────────────┘

Uni Name:    <UNI_NAME>.unis.vendia.net
Uni Status:  RUNNING
Node Count:  3
Nodes Info:  ...
Step 2 - Create Azure Service Principal
A multi-cloud, multi-region Uni allows its participants - the Supplier, the Distributor, and the Retailer - to create and modify Products and Purchase Orders. A participant can then integrate its Vendia Share Node with services in their cloud service provider (CSP) of choice in order to immediately detect and act upon Uni events.
Our next step is to connect the Vendia Retailer Node with an Azure CSP environment. This mimics a common integration approach, where a Retailer has an existing Azure CSP environment and wants to use CSP services to produce or consume data from its Vendia Share Node.
When your Uni reaches a RUNNING state, you'll have a multi-cloud, multi-region Uni, including a Retailer Node. To permit the Retailer Node to send events to an Azure CSP environment secured by an Azure Active Directory (Azure AD) tenant, we need to create a Service Principal within Azure AD.
- Login to your Azure environment using the Azure CLI
az login
- Identify the Subscription ID of your Azure Subscription in which your Azure environment resides. Set the Azure Subscription ID against which future Azure CLI commands will execute
az account set --subscription "[AZURE_SUBSCRIPTION_ID]"
- To confirm the Azure Event Grid used to relay events from Share to your Azure environment is ready for use, we must first register Event Grid as a provider
az provider register --namespace Microsoft.EventGrid
- Wait until the provider is in the
Registeredstateaz provider show --namespace Microsoft.EventGrid --query "registrationState"
- Use the Vendia CLI to determine the Azure AD Application ID for your newly provisioned Retailer Node (the Retailer node in the Uni).
share uni get --uni <UNI_NAME>- In the CLI output of the above command, note the value of the
Retailer.Resources.azure_ApplicationIdproperty. The value hereafter will be referenced as<RETAILER_NODE_APPLICATION_ID>.
- Now it's time to permit connections between the automatically created Vendia tenant for the Retailer Node and your Azure tenant using a Service Principal. After running the command below, note the Service Principal's ID (
objectId) from the output for future reference, hereafter referred to as<SERVICE_PRINCIPAL_ID>.az ad sp create --id "<RETAILER_NODE_APPLICATION_ID>"
Step 3 - Create Azure Function
Now that the Service Principal will permit the Retailer Node to emit events to services within your Azure environment, there are several integration options at our disposal. The integration option we'll explore here is an Azure Function that takes action when an event is received. In this example, consider a Supplier that makes a Purchase Order adjustment (changing the expected fulfillment date) and a Retailer that wants to take immediate action (changing dates for promoting a popular sale, as a result).
To finalize this integration, we next:
-
Create an Azure Function, like this simple Python function below, noting the Function App Resource ID for the subsequent step, hereafter referred to as
<FUNCTION_APP_RESOURCE_ID>Sample init.py
import json import logging import azure.functions as func def main(event: func.EventGridEvent): result = json.dumps({ "id": event.id, "data": event.get_json(), "topic": event.topic, "subject": event.subject, "event_type": event.event_type, }) logging.info('Azure Function processed a Vendia Share event: %s', result) -
Permit the Service Principal created previously to interact with this Azure Function
az role assignment create --assignee "<SERVICE_PRINCIPAL_ID>" --role "Website Contributor" --scope "<FUNCTION_APP_RESOURCE_ID>"
-
Open the Vendia Share web site (https://share.vendia.net/uni), and click your Uni’s name. Find the Retailer Node and click on its
GraphQL Explorerbutton. Clear the sample query in the middle pane, and insert the mutation below.Update Azure Settings Mutation
mutation updateAzureSettings { updateVendia_Settings( input: { azure: { defaultTenantId: "[AZURE_TENANT_ID]" defaultSubscriptionId: "[AZURE_SUBSCRIPTION_ID]" blockReportFunctions: [ { resourceGroupName: "[AZURE_RESOURCE_GROUP]" functionAppName: "[AZURE_FUNCTION_APP_NAME]" functionName: "[AZURE_FUNCTION_NAME]" } ] } } ) { transaction { transactionId submissionTime version } } }- Be sure to update the mutation values as they pertain to your Azure environment:
- [AZURE_TENANT_ID] - The ID of the Azure AD tenant within which your Azure Function resides
- [AZURE_SUBSCRIPTION_ID] - The Subscription ID of the Azure tenant within which your Azure Function resides
- [AZURE_RESOURCE_GROUP] - The name of the resource group that contains your Azure Function App.
- [AZURE_FUNCTION_APP_NAME] - The name of your Azure Function App.
- [AZURE_FUNCTION_NAME] - The name of your Azure Function App Function, which can be found by clicking into the Function App and then clicking
Functions
- Be sure to update the mutation values as they pertain to your Azure environment:
-
Verify the settings were updated as expected before continuing
Get Azure Settings Query
query getAzureSettings {
  getVendia_Settings {
    azure {
      blockReportFunctions {
        functionName
        functionAppName
        resourceGroupName
      }
      defaultSubscriptionId
      defaultTenantId
    }
  }
}
Step 4 - React in Real-Time Events on Azure
Now it's time for the Supplier (from its Vendia Share AWS Node) to make a Purchase Order adjustment. When that happens, the Retailer (from its Vendia Share Azure Node) will be notified immediately and will be able to take action (through its configured Azure Function).
-
Using the Vendia Share Web Application's GraphQL Explorer of the Supplier's AWS Node, identify a Purchase Order to modify, noting the
_idfor one of the Purchase Orders listed for the subsequent step, referred to hereafter as<PO_ID>List Purchase Orders Query
query listPurchaseOrders { list_PurchaseOrderItems { _PurchaseOrderItems { _id _owner created expected fulfilled orderId updated items { quantity sku } } } } -
Execute a GraphQL mutation (or use Vendia Share's Entity Explorer to make an equivalent update without any GraphQL) to modify the PO identified in the previous step
Update Purchase Order Mutation
mutation updatePurchaseOrder {
  update_PurchaseOrder(
    id: "<PO_ID>",
    input: {
      expected: "2022-01-03T00:00:00Z"
    }
  ) {
    transaction {
      transactionId
      submissionTime
      version
    }
  }
}
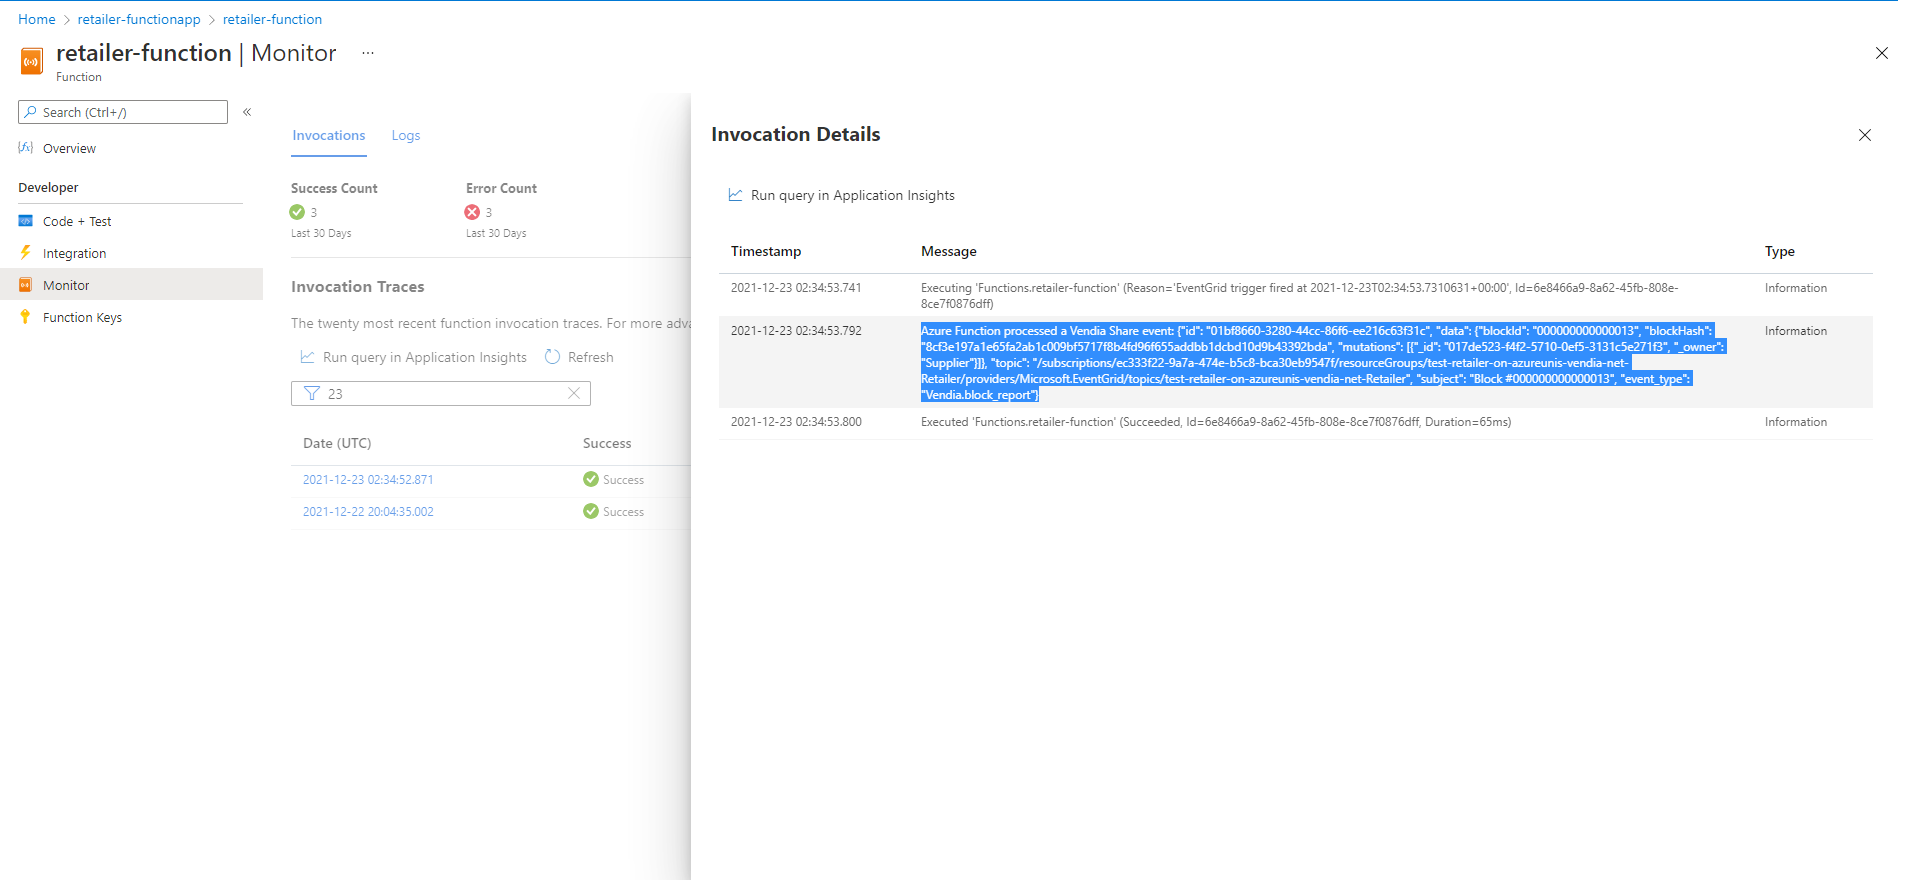
The update to the Supplier Node will cause an event, a block notification, to be emitted from the Retailer Node. The Retailer Node, thanks to the configuration in previous steps, will act on that event through the configured Azure Function. We can now view the output of the Azure Function, which was triggered through the Retailer's Azure Node, using the Azure-provided Application Insights view.

Key Takeaways
Vendia Share's new Azure eventing mechanism allows partners - in this case a Supplier, a Distributor, and a Retailer - to keep each other informed, in real-time, and act on updates as they happen. While this capability is still a beta feature, we'd love to get your feedback.
Now that you've seen how simple it is to create an integration between a Vendia Share Node and an Azure Function, check out one of several other Azure integration patterns that can be used to process events that transpire across a Uni. Or, check out one of our other Quick Starts if you're relatively new to Vendia Share.

